- How to Install SalesforceXytoolsForSublime
- How to Config SalesforceXytoolsForSublime
- Use SalesforceXytoolsForSublime to develop SFDC
- Export Sobject to Excel and Search Sobject
- Run sfdc soql, apex script, tooling api
- Auto config salesforce ant-dataloader and Backup Sobject Data
- Auto config salesforce ant-migration-tools and Backup Metadata
- Export Sfdc Sobject Schema To Excel
- Use SalesforceXytoolsForSublime Salesforce Deploy Package
- Salesforce package.xml Auto Builder
- How to export Apex Code Coverage
- PermissionSet Builder
- Soql Creator
- Save Your Sfdc Module and build a deploy module package
- Search sfdc metadata
- Copy a Lightning Component
- Lightning Web Components HelloWorld
- Auto Create Salesforce VisualForce Apex
- Salesforce test code creator
- SalesforceXytoolsForSublime Reference
How to Install SalesforceXytoolsForSublime
SalesforceXytoolsForSublime
SalesforceXytoolsForSublime is Rapid development tools for Salesforce Development.
-
Create Salesforce Project, Retrieve Metadata, Search Metadata
-
Create ApexClass, ApexTrigger, ApexComponent, Refresh, Diff with Server(Support winmerge diff), Save to Server, Deploy to Server
-
SObject Viewer, SObject Description, Export SOjbect Fields to Excel
-
Run SOQL Query, Tooling Query, Apex Script.
-
Code Creator : Auto Create Apex Test Class Code, Auto Create Test Data For Apex Test Class.
-
SFDC Dataviewer, SFDC Online Dataviewer.
-
Atuo Login SFDC (two login type: oauth2 , password config).
-
Quick local sfdc file from sublime.
-
Quick Search SObject Data/SObject Setting/ApexClass/Trigger/VisualForce Page/VisualForce Components/Email Template/Static Resource and open on browser Quickly
-
Package.xml Builder.
-
Build Release Package.
-
Integrate Sfdc Dataloader, Config DataLoader and Run (Need Ant and Java Environment)
Set your schedule, backup your sfdc data.
-
Integrate Sfdc Migration Tool (Need Ant and Java Environment)
-
Auto Backup all metadata script(Set your schedule, backup your sfdc metadata.).
How to Install
Prerequisites
- Sublime Text 3 http://www.sublimetext.com/3
- Sublime Text Package Control https://packagecontrol.io/installation
Use Package Control to Install
- Open Sublime Text 3
-
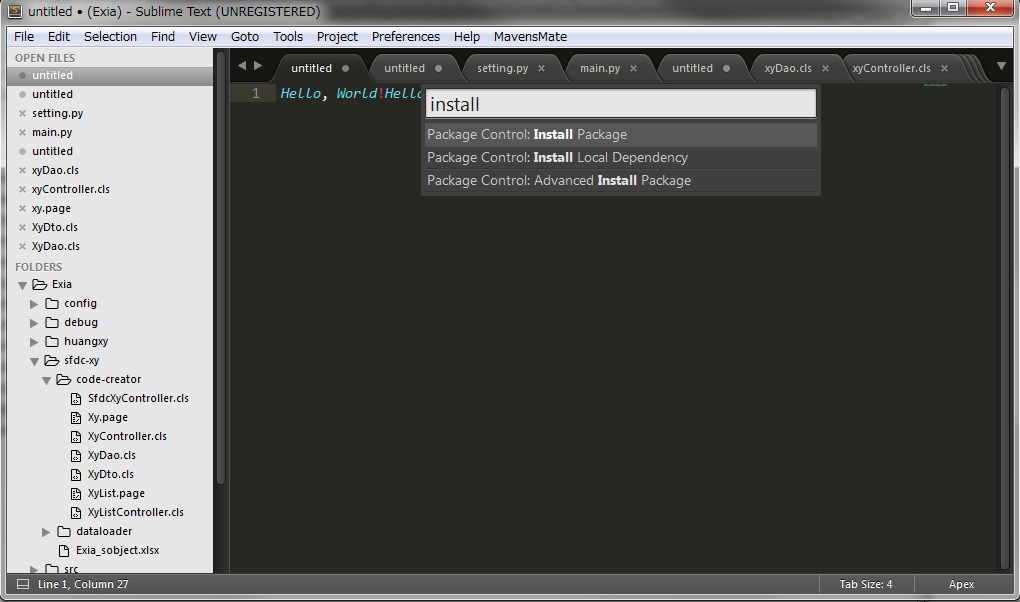
Run
Package Control: Install Packagecommand - Search for
SalesforceXyTools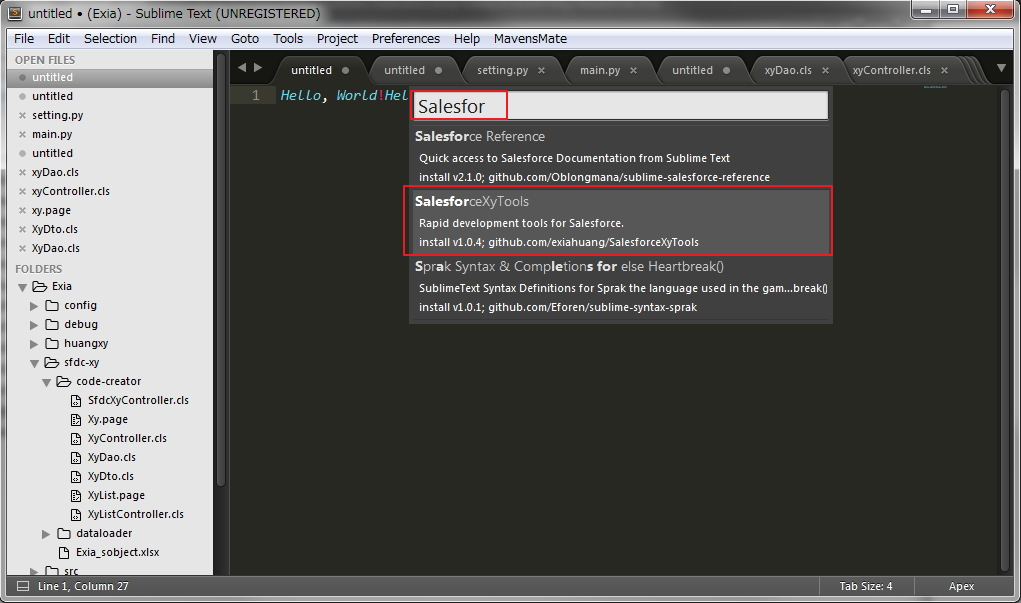
- Hit
Enter, That is all.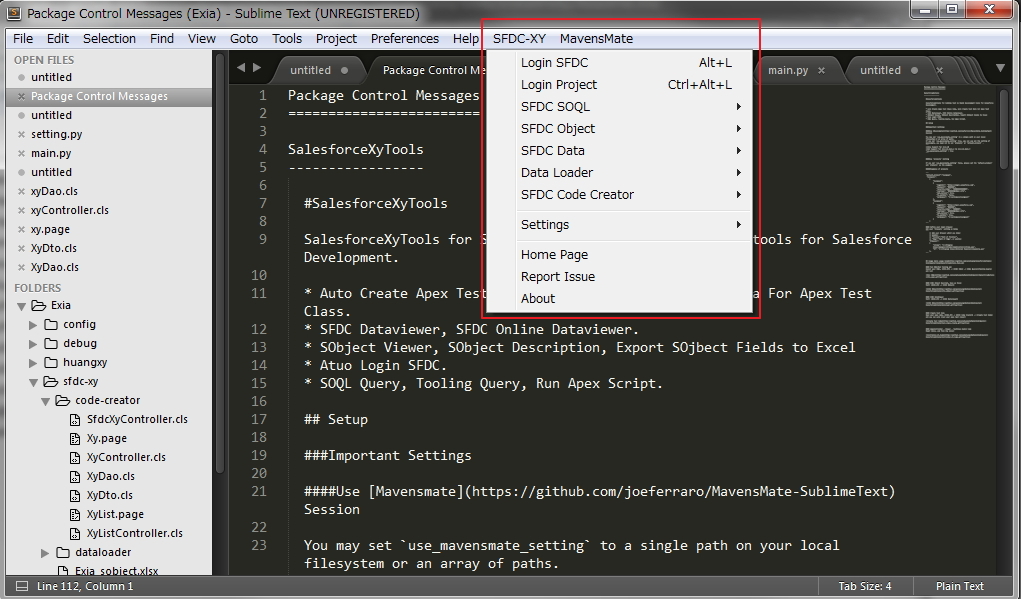
Suggestion
If you want to use ant-dataloader or ant-migration tools, I suggest you to install java and ant
Install java
just install it...
Please set your JAVA_HOME
Installing Apache Ant
To get up and running with the binary distribution of Ant quickly, follow these steps:
- Make sure you have a Java environment installed. See System Requirements for details.
- Download Ant. See Binary Distribution for details.
- Uncompress the downloaded file into a directory.
- Set environmental variables:
JAVA_HOMEto your Java environment,ANT_HOMEto the directory you uncompressed Ant to, and add ${ANT_HOME}/bin (Unix) or %ANT_HOME%/bin (Windows) to yourPATH. See Setup for details. - Optionally, from the
ANT_HOMEdirectory run ant -f fetch.xml -Ddest=system to get the library dependencies of most of the Ant tasks that require them. If you don't do this, many of the dependent Ant tasks will not be available. See Optional Tasks for details and other options for the -Ddest parameter. - Optionally, add any desired Antlibs. See Ant Libraries for a list.
How to Config SalesforceXytoolsForSublime
How to Config
New Project

Config Project
Project Setting > Project Config Wizard
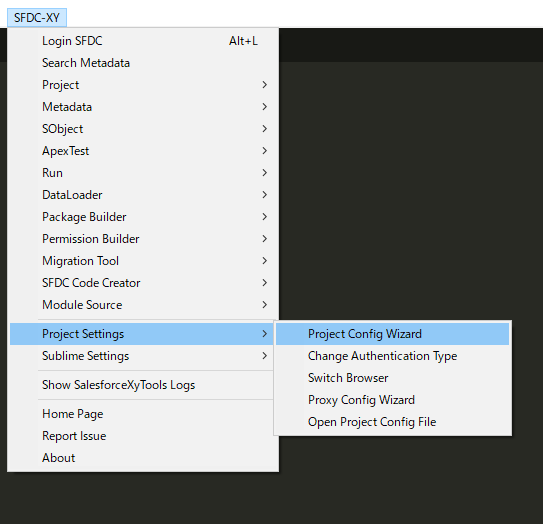
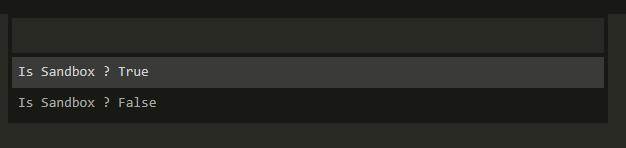
- Select Sandbox Or Product
- Input your username
- Input your password
- Input your security_token. If you haven't security_token, let it blank
- Select your API Version
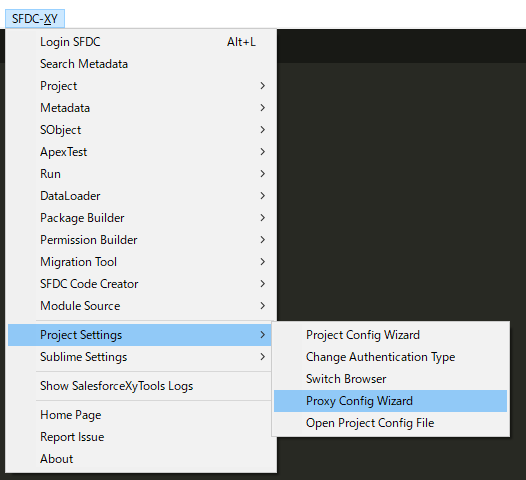
Proxy Config
Project Setting > Proxy Config Wizard
Start to develop sfdc
Login Test
SFDC > Login SFDC
Retrieve Metadata
Select metadata to retrieve
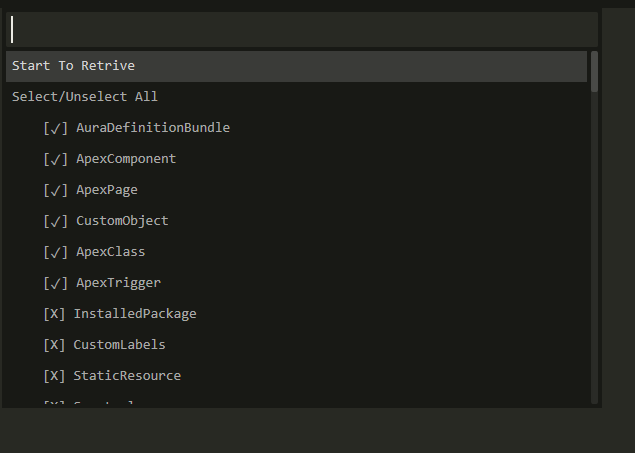
And Click Start To Retrive
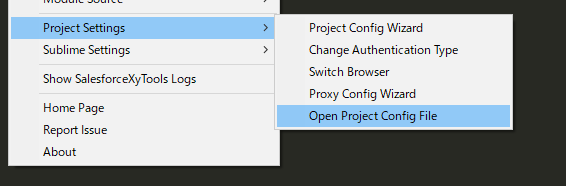
Modify the config file.
You also can modify the config file in /.xyconfig/xyconfig.json.
You can use Project Settings > Open Project Config File.
Each project has a config file.
{
    "username": "input your username",
    "password": "input your password",
    "security_token": "",
    "is_sandbox": true,
    "api_version": 40.0,
    "src_dir": "src",
    "authentication": "password",
    "jar_home": "C:\\Users\\exia\\salesforce-project\\jar",
    "use_os_terminal": false,
    "auto_save_to_server": false,
    "app" : {
        "winmerge": "C:\\Program Files (x86)\\WinMerge\\WinMergeU.exe",
        "notepad": "C:\\Program Files (x86)\\Notepad++\\notepad++.exe {file_name}",
        "Bash" : "cmd /k cd /d {file_dir}"
    },
    "default_browser": "chrome",
    "browsers": {
        "chrome": "C:\\Program Files (x86)\\Google\\Chrome\\Application\\chrome.exe",
        "IE": "C:\\Program Files\\Internet Explorer\\iexplore.exe"
    },
    "debug_levels": {
        "Apex_Code": "DEBUG",
        "Callout": "INFO",
        "Workflow": "INFO",
        "Apex_Profiling": "INFO",
        "Validation": "INFO",
        "DB": "Info",
        "System": "DEBUG"
    },
    "proxy": {
        "use_proxy" : false,
        "proxyhost" : "127.0.0.1",
        "proxyport" : "8888",
        "proxyuser" : "proxyuser",
        "proxypassword" : "proxypassword"
    }
}
Config your login Browser
Add your browsers setting as below.
You can use Project Settings > Switch Broswer to set your default browser.
// Add your browser which you like!
// examle:
// "firefox":"Path of firefox!",
"browsers":
{
    "chrome": "C:\\Program Files\\Google\\Chrome\\Application\\chrome.exe",
    "IE": "C:\\Program Files\\Internet Explorer\\iexplore.exe",
    "Firefox": "C:\\Program Files\\Firefox.exe"
},
Use Oauth2 to access sfdc.
If you want to use oauth2 to access salesforce, please click
Project Settings > Change Authentication Type to set your authentication type.
Use SalesforceXytoolsForSublime to develop SFDC
Topic
- Use SalesforceXytoolsForSublime to develope sfdc
- create/update/delete/refresh local file : ApexClass, ApexTrigger, ApexPage, ApexComponent
- Diff between localhost and server
- Open metadata in sfdc
- Deploy : ApexClass, ApexTrigger, ApexPage, ApexComponent, Lightning
- Run Test Class
Environment
- Make sure you can login your sfdc. Test it : SFDC-XY > Login SFDC
Start Develope
Create ApexClass
This is an example of batch apexclass.
Step1. New ApexClass
Metadata > New ApexClass
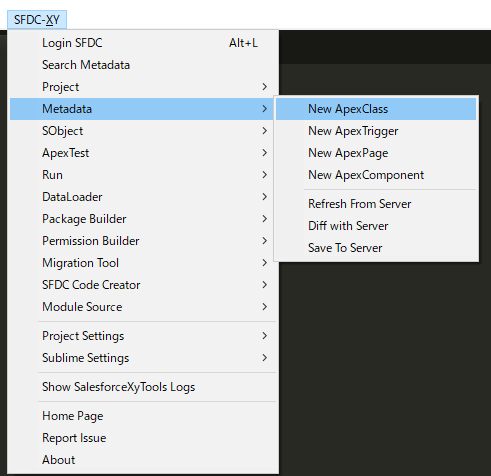
Tips : Create ApexClass, ApexTrigger, ApexPage, ApexComponent in the same way
Step2. Select Apex template
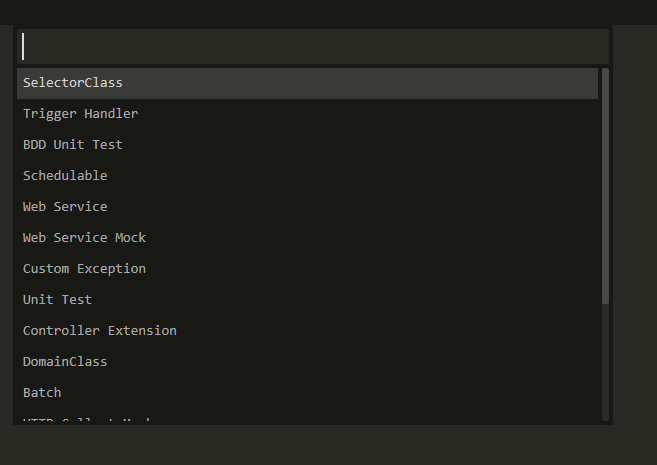
Tips: search batch

Input your batch name
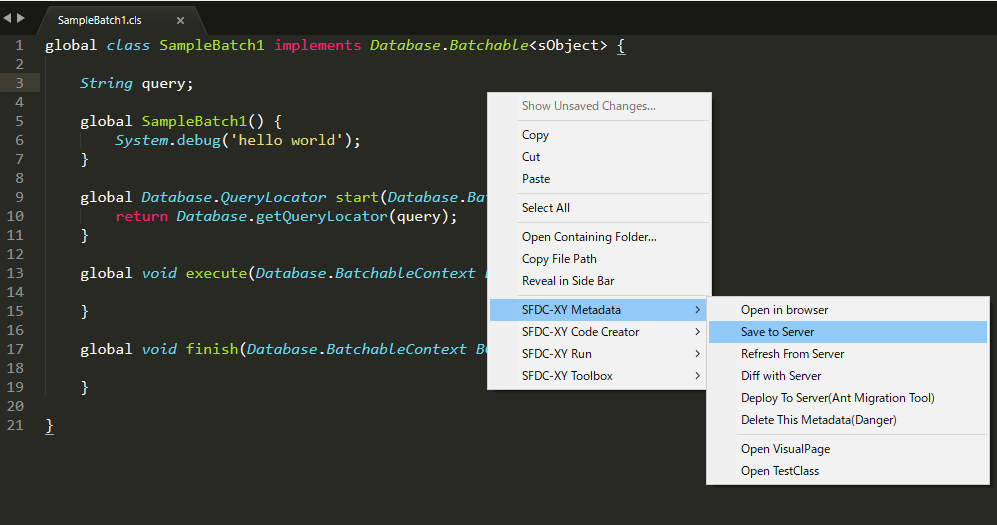
global class SampleBatch1 implements Database.Batchable<sObject> {

    String query;

    global SampleBatch1() {

    }

    global Database.QueryLocator start(Database.BatchableContext BC) {
        return Database.getQueryLocator(query);
    }

    global void execute(Database.BatchableContext BC, List<sObject> scope) {

    }

    global void finish(Database.BatchableContext BC) {

    }

}
Update ApexClass
Change your apexclass,
Right click, SFDC-XY Metadata > Save To Server
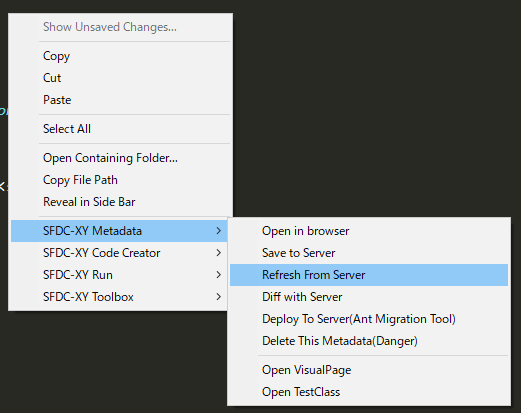
Refresh From Server
Right click, SFDC-XY Metadata > Refresh From Server
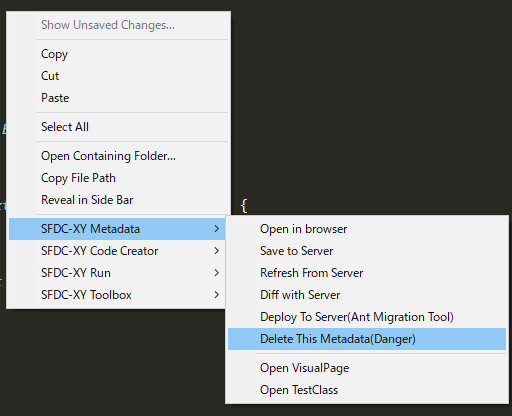
Delete
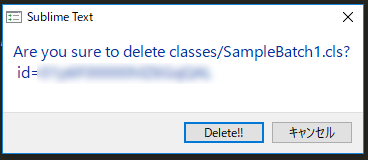
Right click, SFDC-XY Metadata > Delete this metadata(Danger)
It will pop up a dialog like this.
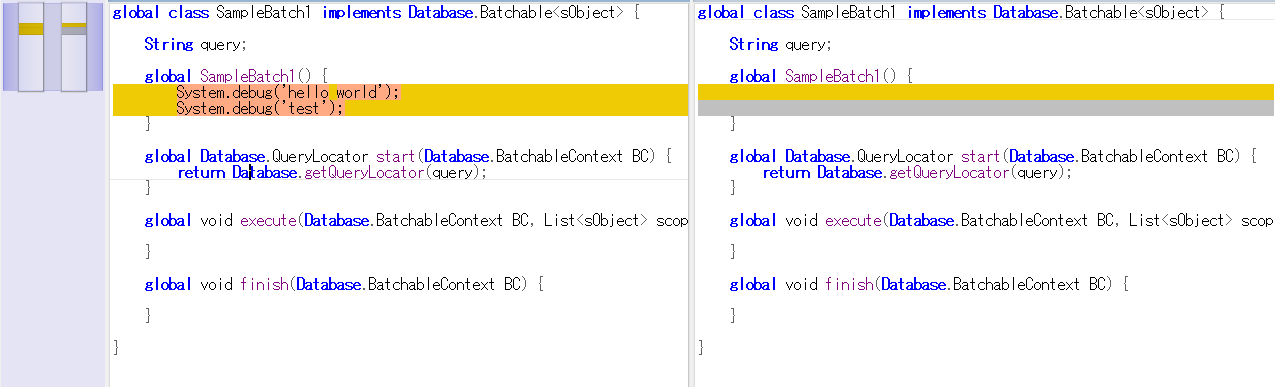
Diff between localhost and server
Config your Winmerge
Project Setting > Open Project Config file
set your winmerge like below.
.......
    "app": {
        "Bash": "cmd /k cd /d {file_dir}",
        "winmerge": "C:\\Program Files (x86)\\WinMerge\\WinMergeU.exe",
        "notepad": "C:\\Program Files (x86)\\Notepad++\\notepad++.exe {file_name}"
    },
.......
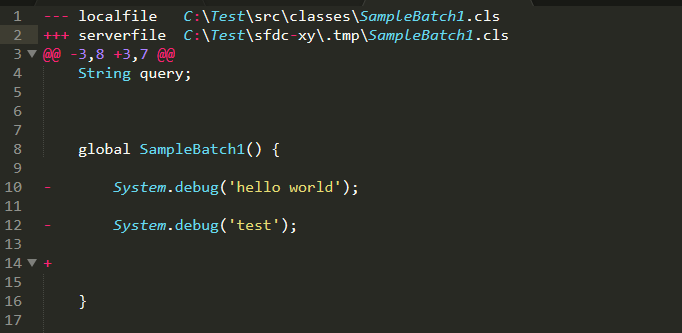
Diff source
Right click, SFDC-XY Metadata > Diff with Server
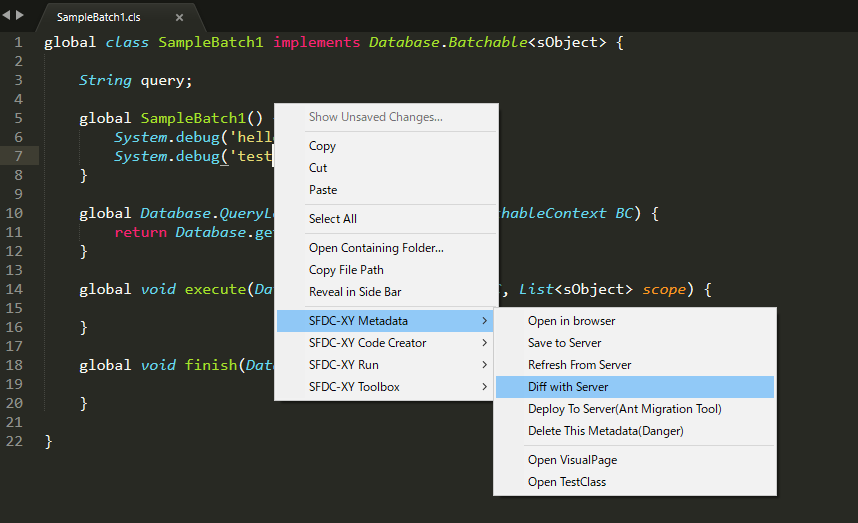
if you do not set winmerge, it will use simple diff.
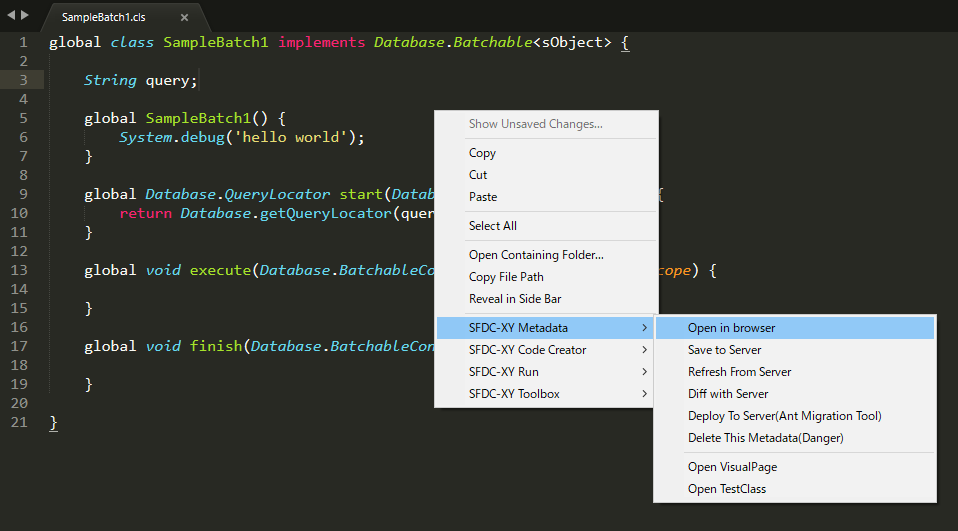
Find your source in sfdc
Right click, SFDC-XY Metadata > Save To Server
It will go to sfdc source page.
Deploy To SFDC
There are some different between Deploy and save.
Right click, SFDC-XY Metadata > Deploy To Server(Ant Migration Tool)
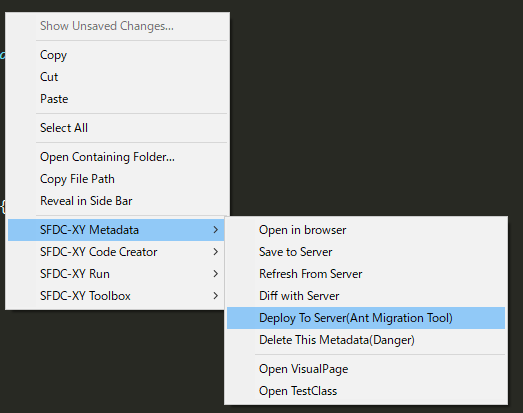
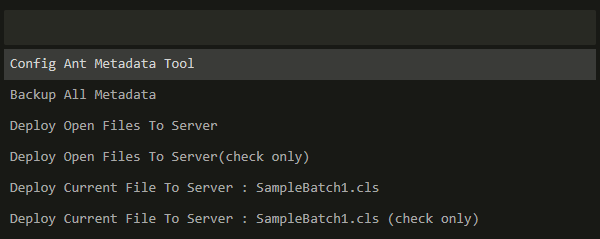
There 4 ways to deploy to sfdc server. If you select check only , it never actually saves to the server.
-
Deploy Open Files To Server:
-
Deploy Open Files To Server(check only):
-
Deploy Current File To Server :
xxx.cls -
Deploy Current File To Server :
xxx.cls(check only)
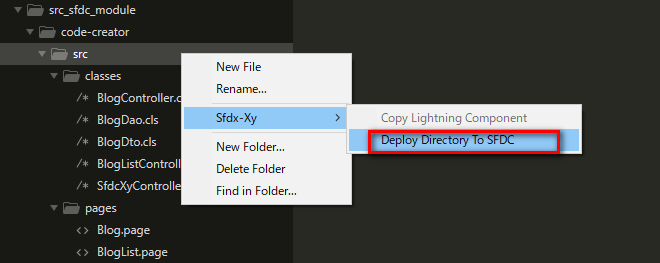
Deploy the folder
choose your folder or source in sublime folders, then right click.
Find the menu : Sfdc-Xy > Deploy Directory To SFDC
Run Test Class
Right click, SFDC-XY Run > Run Test Class

Summary
Project
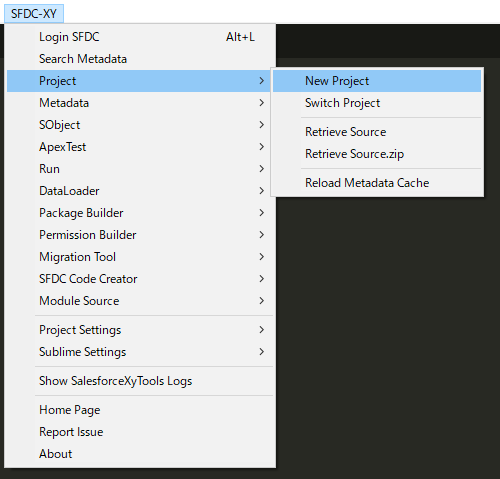
New Project
Project > New Project
Input your project directory, and create your sfdc project
Switch Project
Project > Switch Project
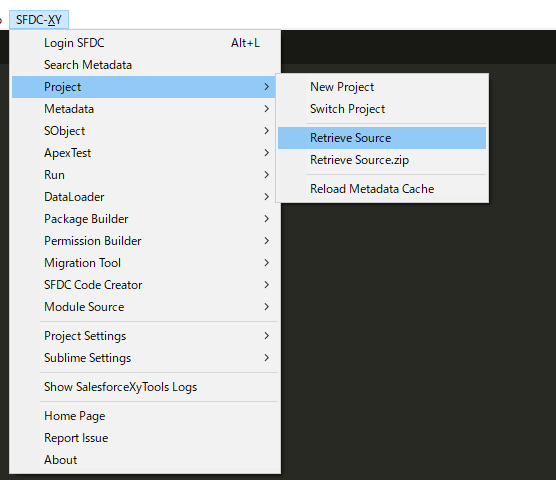
Retrieve Source
Project > Retrieve Source
Select metatdata type, and click Start To Retrieve to retrieve source.
The old source src directory will be remove to src_backup
Retrieve Source zip
Project > Retrieve Source.zip
Input your project directory, and retrieve zip.
Reload Metadata Cache
Project > Reload Metadata Cache
Not need to Reload Metadata Cache.
Metadata
Create ApexClass, ApexTrigger, ApexPage, ApexComponent
Metadata > New ApexClass
Metadata > New ApexTrigger
Metadata > New ApexPage
Metadata > New ApexComponent
Refresh Source
Metadata > Refresh From Server
Diff with Server
Metadata > Diff with Server
If you want to use winmerge to check the different between local and server,
Please config /.xyconfig/xyconfig.json, set winmerge.
If you set winmerge blank, it will diff in sublime.
Tips: You must use
\\if you use Windows, such as"C:\\Program Files (x86)\\WinMerge\\WinMergeU.exe"
Save To Server
Metadata > Save To Server
Deploy To Server
Please use Migration Tools to deploy sources.
Migration Tool > Ant Migration Tool
Export Sobject to Excel and Search Sobject
Topic
- Use SalesforceXytoolsForSublime To Build Salesforce Deploy Package
- Search sobject and view data
- Export Sobject Schema To Excel.
Environment
- Make sure you can login your sfdc. Test it : SFDC-XY > Login SFDC
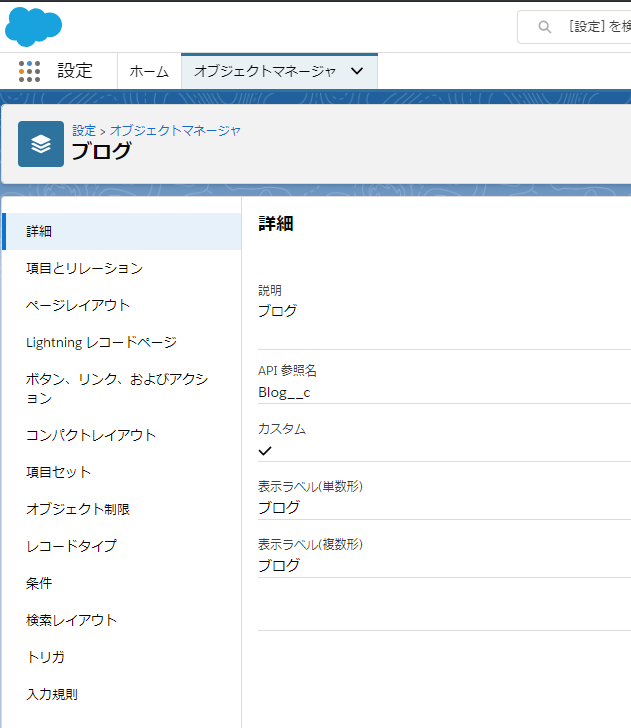
Sobject
Open SObject Manager Page
SObject > Search Sobject(Browser)
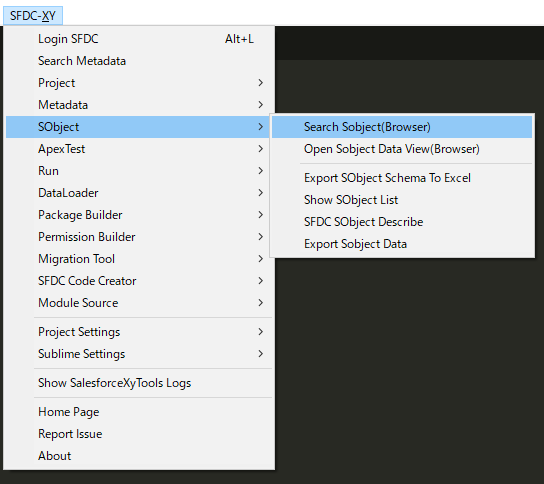
Search the sobject, then it will open the sobject manager page in browser.

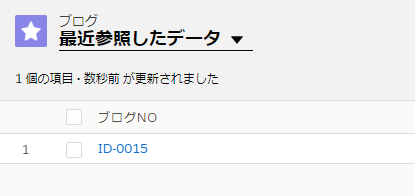
View SObject Data In Browser
SObject > Open Sobject Data View(Browser)
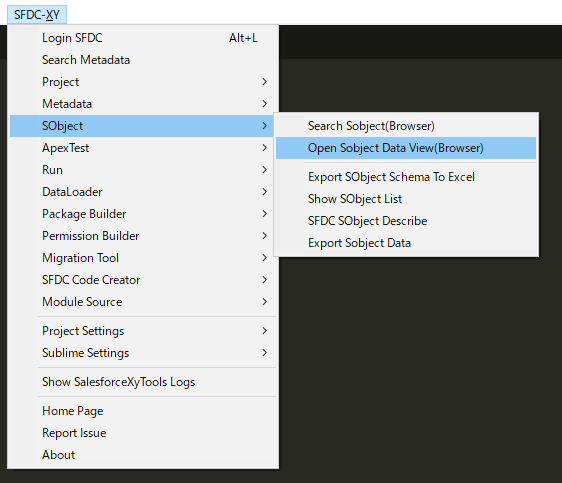
Search the sobject, then it will open the data manager page in browser.
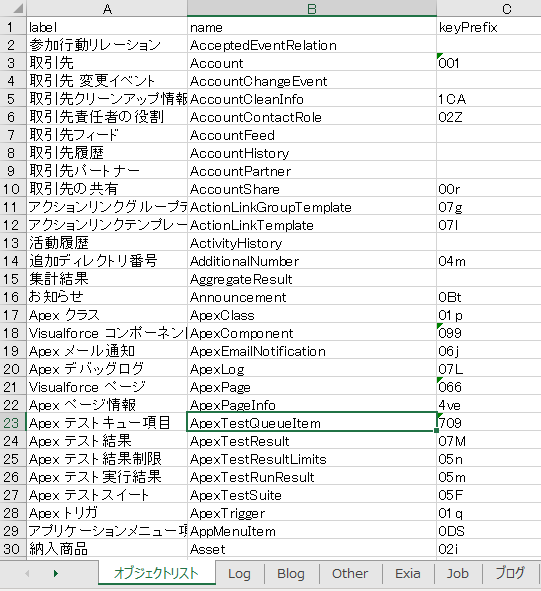
Export Sobject Schema To Excel
Sobject > Export Sobject Schema To Excel
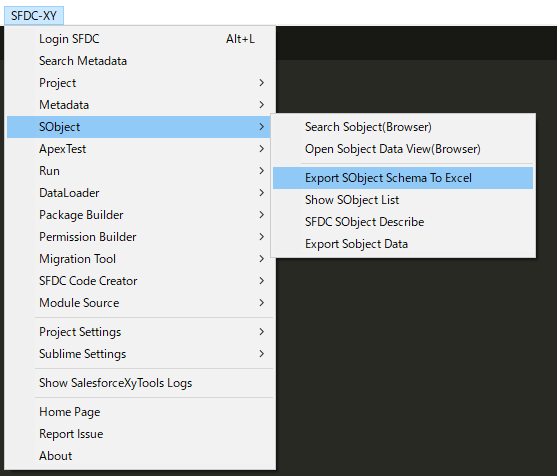
Example,
Export SObject List To Txt
Sobject > Show Sobject List

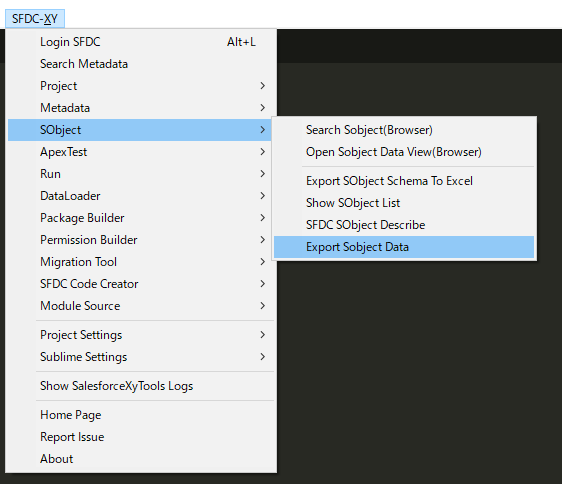
Export SObject Data To Txt
Sobject > Export Sobject Data

summary
SObject
SObject > Search Sobject(Browser)
SObject > Open Sobject Data View(Browser)
Sobject > Export Sobject Schema To Excel
Sobject > Show Sobject List
Sobject > Export Sobject Data
Run sfdc soql, apex script, tooling api
Topic
- Run soql query
- Run apex script
- Run tooling query
Environment
- Make sure you can login your sfdc. Test it : SFDC-XY > Login SFDC
Run Soql query
First, Select your soql
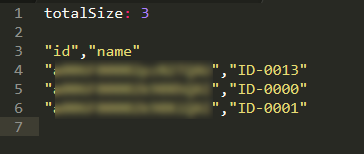
Then right click, SFDC-XY Run > SOQL Query
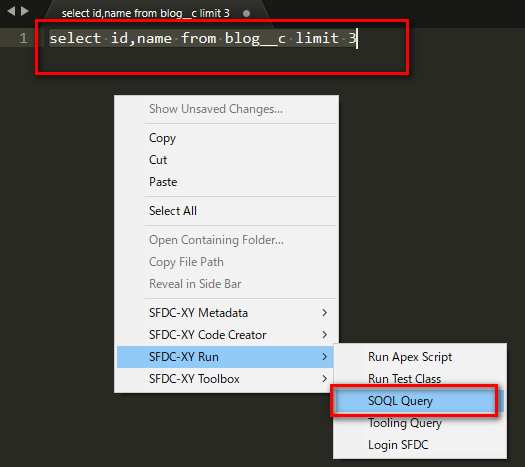
result :
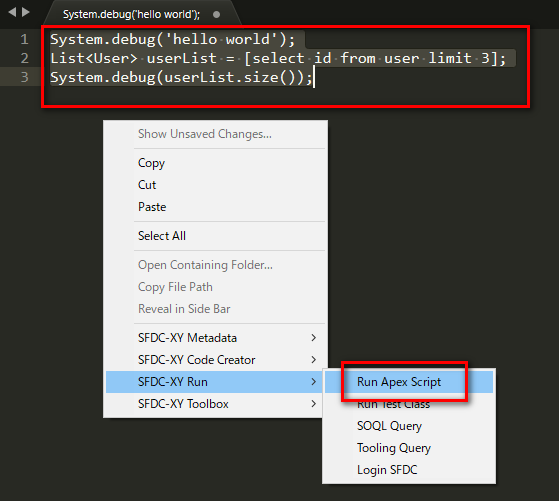
Run Apex Script
select your apex script,
right click, SFDC-XY Run > Run Apex Script
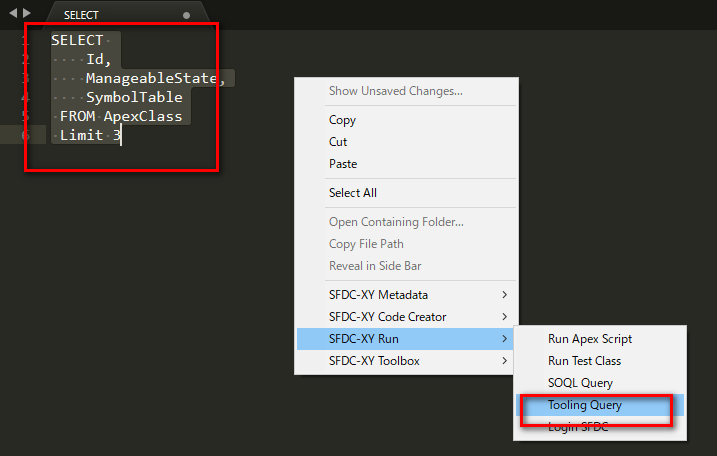
Run Tooling query
select your tooling query,
right click, SFDC-XY Run > Tooling Query
Auto config salesforce ant-dataloader and Backup Sobject Data
Topic
- Use SalesforceXytoolsForSublime To Config Dataloader and backup sfdc sobject data.
- Auto config dataloader.
- Backup salesforce sobject data.
Environment
- Set up your
javaandantenvironment. - You must install
javaandantbefore useant dataloader. - You not need to Install the
dataloader. - Make sure you can login your sfdc. Test it : SFDC-XY > Login SFDC
Tips : You not need to Install the dataloader, Salesforcexytools integrates with dataloader.
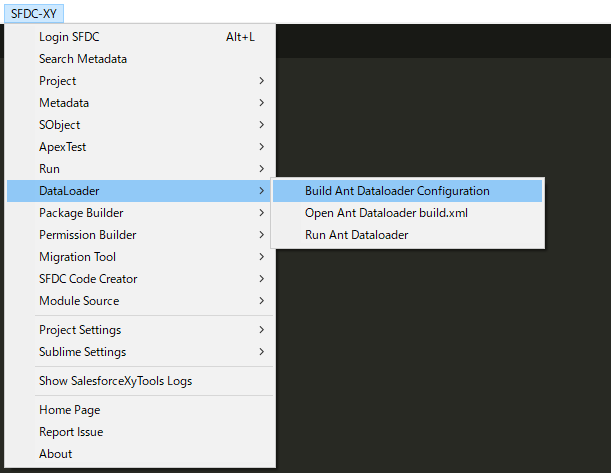
Auto Config Dataloader
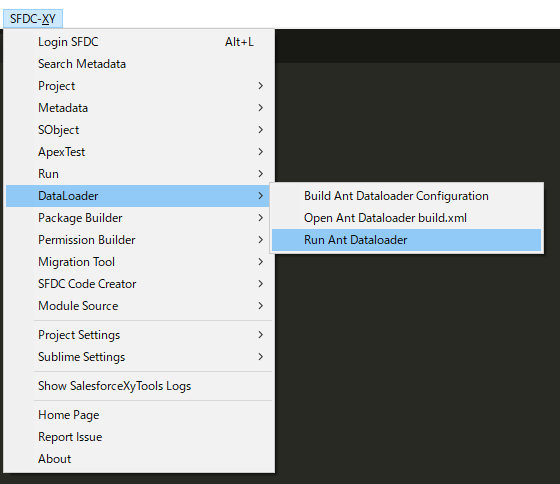
Open Sublime-Menu : SFDC-XY > Dataloader > Build Ant Dataloader Configuration
Select Your Sobjects and Select Start To Config, example:
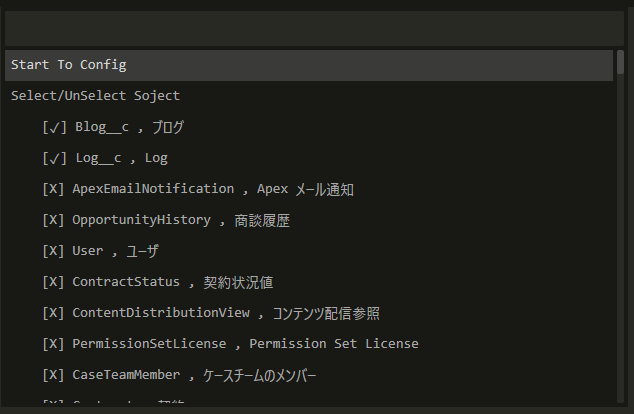
You can find AntDataloader in ./sfdc-xy/AntDataloader Folder.
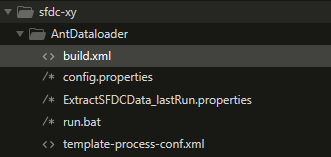
Run AntDataloader
Ant command
cd ./sfdc-xy/AntDataloader
ant
Run in sublime
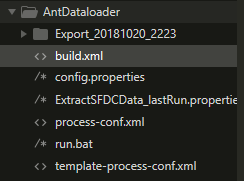
Dataloader > Run Ant Dataloader
The data will be export to /sfdc-xy/AntDataloader/Export_YYYYMMDD_HHmm
config your soql
Open ./sfdc-xy/AntDataloader/build.xml
Add your export task, you can export sfdc sobject data easily.
    <target name="start_export">
        <!-- <export file="{FILE_NAME}" object="{SOBJECT_NAME}" soql="{SOQL}"/> -->
        <export file="Blog__c" object="Blog__c" soql="SELECT Id , Name , Title__c, Body__c FROM Blog__c"/>
        <export file="Log__c" object="Log__c" soql="SELECT Id , Name, Body__c FROM Log__c"/>
    </target>
Tips: Config the
build.xmland copyAnt Dataloaderto anywhere, and add your schedule job to export sfdc data.
Schedule Task , Auto Backup sfdc sobject data.
copy ./sfdc-xy/AntDataloader To any folder. and schedule task.
Auto config salesforce ant-migration-tools and Backup Metadata
Topic
- Use SalesforceXytoolsForSublime To Config ant-migration-tools and backup metadata.
- Auto config ant-migration-tools.
- Backup all salesforce metadata in one click. You do not need to config package.xml !
Environment
- Set up your
javaandantenvironment. - You must install
javaandantbefore useant dataloader. - You not need to Install the
dataloader. - Make sure you can login your sfdc. Test it : SFDC-XY > Login SFDC
Auto Config ant-migration-tools
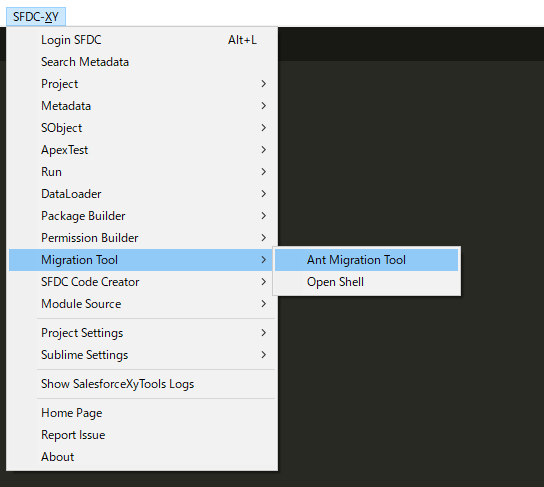
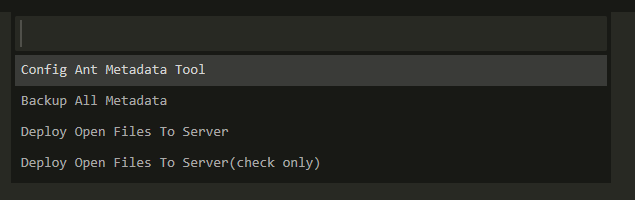
Sublime-Menu :SFDC-XY > Migration Tool > Ant Migration Tool
Select Config Ant Metadata Tool
Backup all Metadata
Sublime-Menu :SFDC-XY > Migration Tool > Ant Migration Tool
Select
Backup All Metadata
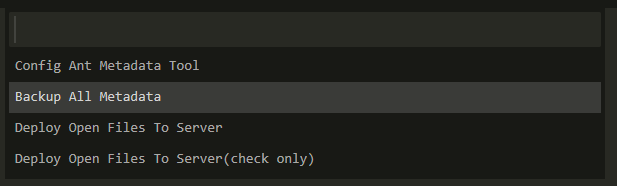
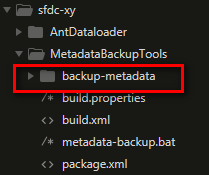
It will take some time to backup all sfdc metadata. It will backup to the sfdc-xy\MetadataBackupTools\backup-metadata\
Tips : It is base on Ant Migration Tool .
Schedule Task , Auto Backup sfdc metadata.
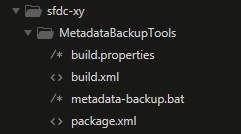
You can find ant-migration-tools in ./sfdc-xy/MetadataBackupTools Folder.
You don't need to config package.xml.
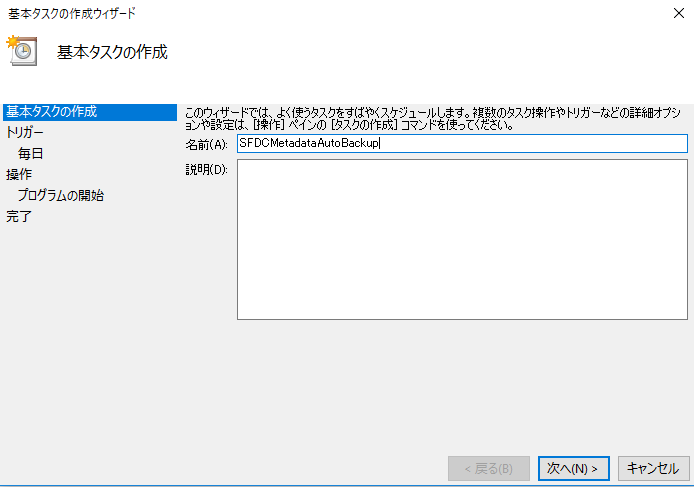
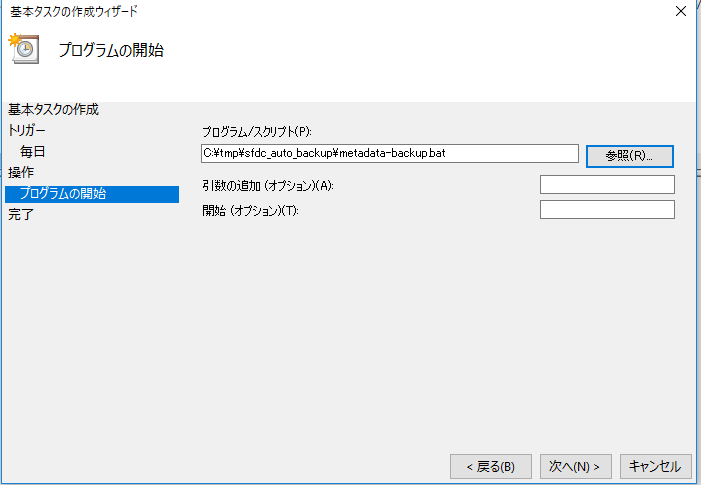
Just copy MetadataBackupTools and config your system tasks
windows
In windows, you can set task like this.
Unix cron
You can set your cron job in unix/ linux/ mac
Export Sfdc Sobject Schema To Excel
Topic
- Use SalesforceXytoolsForSublime To Config Dataloader and backup sfdc sobject data.
- Export Sfdc Sobject Schema To Excel.
Environment
- Make sure you can login your sfdc. Test it : SFDC-XY > Login SFDC
Sobject Schema To Excel
Open Sublime-Menu : SFDC-XY > Sobject > Export Sobject Schema To Excel
Example,
Use SalesforceXytoolsForSublime Salesforce Deploy Package
Topic
- Use SalesforceXytoolsForSublime To Build Salesforce Deploy Package
Example
Example, Open Account.object,Blog.page,BlogController.cls,Blog__c.object in Sublime

Sublime-Menu : SFDC-XY > Package Builder > Build Deploy package From Open Files
Input your save path
You can build package.xml like below.
src
  │  package.xml
  │
  ├─classes
  │      BlogController.cls
  │      BlogController.cls-meta.xml
  │
  ├─objects
  │      Account.object
  │      Blog__c.object
  │
  └─pages
          Blog.page
          Blog.page-meta.xml
about package.xml
<?xml version="1.0" encoding="UTF-8"?>
<Package xmlns="http://soap.sforce.com/2006/04/metadata">

    <types>
        <members>Blog</members>
        <name>ApexPage</name>
    </types>
    <types>
        <members>BlogController</members>
        <name>ApexClass</name>
    </types>
    <types>
        <members>Account</members>
        <members>Blog__c</members>
        <name>CustomObject</name>
    </types>
    <version>42.0</version>
</Package>
Salesforce package.xml Auto Builder
Topic
- Use SalesforceXytoolsForSublime To Build package.xml
There are 2 ways to build package.xml 1. Build From SFDC API. 2. Use local file to build package.xml.
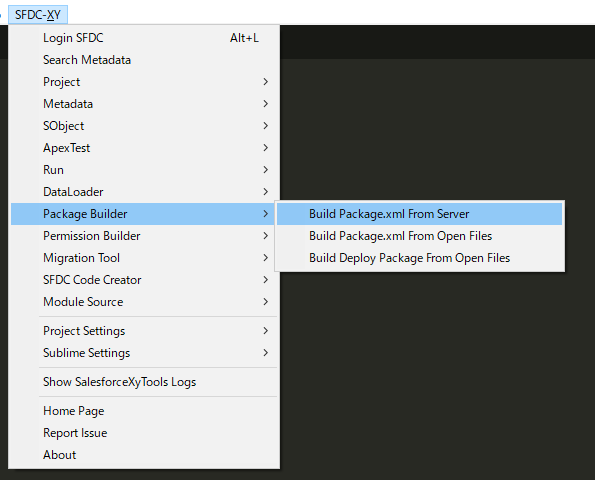
Build package.xml From Server
Sublime-Menu :SFDC-XY > Package Builder > Build Package.xml From Server
You can build package.xml like below.
<?xml version="1.0" encoding="UTF-8"?>
<Package xmlns="http://soap.sforce.com/2006/04/metadata">

    <types>
        <members>*</members>
        <name>InstalledPackage</name>
    </types>
    <types>
        <members>*</members>
        <name>CustomLabels</name>
    </types>
    <types>
        <members>*</members>
        <name>StaticResource</name>
    </types>
   ............
   ............
   ............
   ............
   ............
   ............
   ............
   ............
    <types>
        <members>*</members>
        <name>Settings</name>
    </types>
    <version>42.0</version>
</Package>
Build package.xml From Open Files
Example, Open Account.object,Blog.page,BlogController.cls,Blog__c.object in Sublime
Sublime-Menu : SFDC-XY > Package Builder > Build package.xml From Open Files
You can build package.xml like below.
<?xml version="1.0" encoding="UTF-8"?>
<Package xmlns="http://soap.sforce.com/2006/04/metadata">

    <types>
        <members>Blog</members>
        <name>ApexPage</name>
    </types>
    <types>
        <members>BlogController</members>
        <name>ApexClass</name>
    </types>
    <types>
        <members>Account</members>
        <members>Blog__c</members>
        <name>CustomObject</name>
    </types>
    <version>42.0</version>
</Package>
Summary
Package Builder
Build Package.xml From Server
Package Builder > Build Package.xml From Server
Export all package.xml from server
Build Package.xml From Server From Open Files
Package Builder > Build Package.xml From Open Files
Build The deploy package from open files
Package Builder > Build Deploy Package From Open Files
This is only copy the open files to a dir, not deploy to server.
How to export Apex Code Coverage
Topic
- Use SalesforceXytoolsForSublime To Export
Apex Code Coverage
- Export
Apex Code Coverage
Environment
- Make sure you can login your sfdc. Test it : SFDC-XY > Login SFDC
Sobject
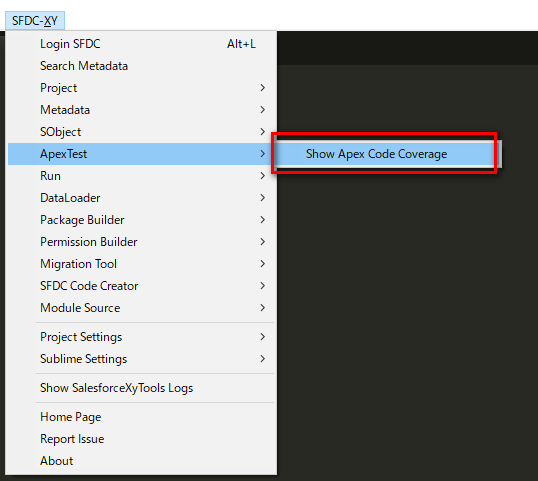
Open SObject Manager Page
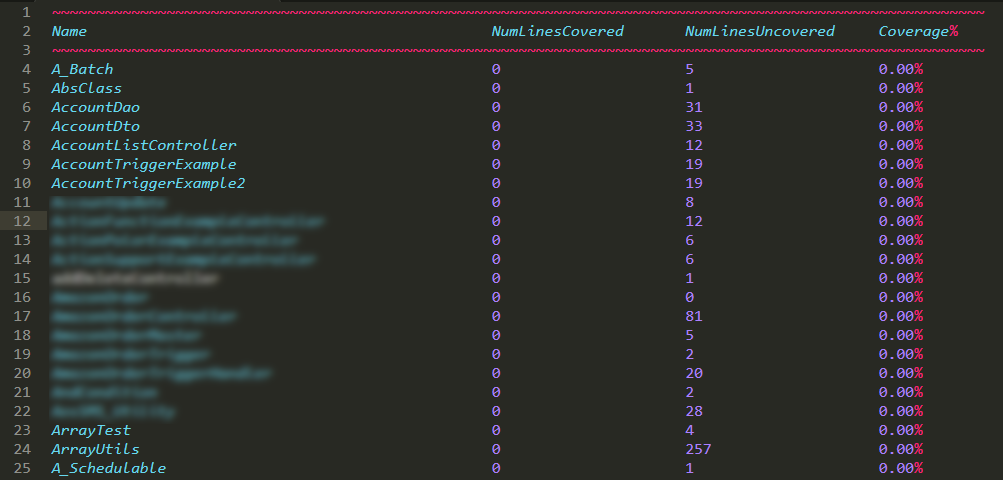
ApexTest > Show Apex Code Coverage
Result
PermissionSet Builder
Topic
- Use SalesforceXytoolsForSublime To Build fieldPermission and objectPermission
- Build permissionset file
Environment
- Make sure you can login your sfdc. Test it : SFDC-XY > Login SFDC
Create Permission.xml
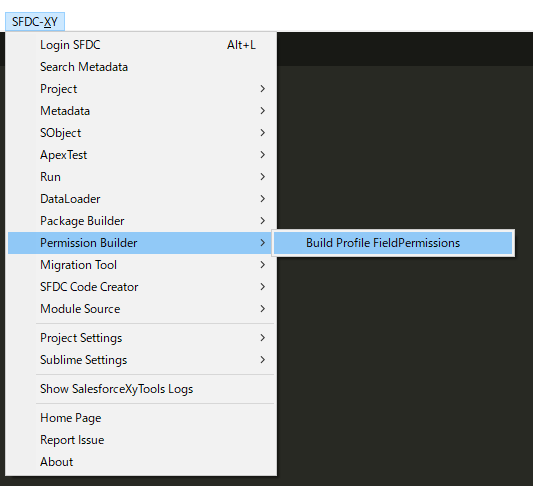
Open SObject Manager Page
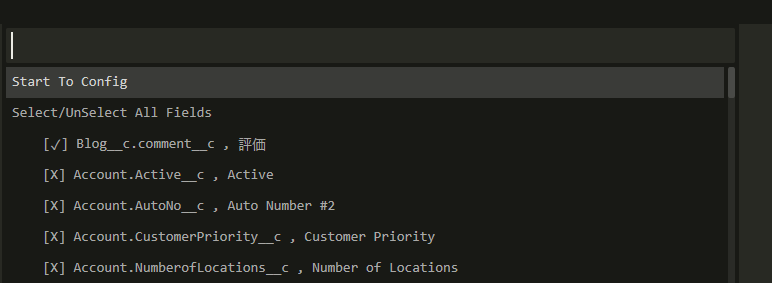
Permission Builder> Build Profile FieldPermissions
Select your field
The Permissionset file :
<?xml version="1.0" ?>
<PermissionSet xmlns="http://soap.sforce.com/2006/04/metadata">
  <fieldPermissions>
    <editable>true</editable>
    <field>Blog__c.comment__c</field>
    <readable>true</readable>
  </fieldPermissions>
  <objectPermissions>
    <allowCreate>true</allowCreate>
    <allowDelete>true</allowDelete>
    <allowEdit>true</allowEdit>
    <allowRead>true</allowRead>
    <modifyAllRecords>true</modifyAllRecords>
    <object>Blog__c</object>
    <viewAllRecords>true</viewAllRecords>
  </objectPermissions>
  <hasActivationRequired>false</hasActivationRequired>
  <label>AllPermission</label>
  <license>Salesforce</license>
</PermissionSet>
Deploy permission.xml
right click , deploy it.
Soql Creator
Topic
- Use SalesforceXytoolsForSublime To Create soql
Environment
- Make sure you can login your sfdc. Test it : SFDC-XY > Login SFDC
Create Soql
SFDC Code Creator > Create Soql
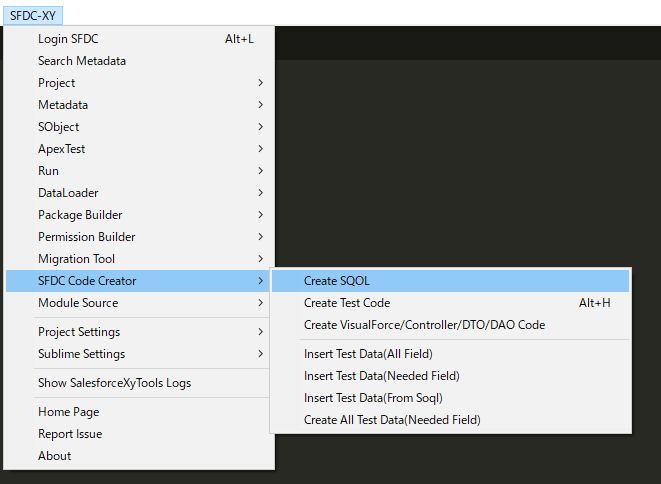
Select Soql Type
result :
select
Id, //カスタムオブジェクト ID
OwnerId, //所有�ID
IsDeleted, //削除
Name, //ブãƒã‚°No
RecordTypeId, //レコードタイ�ID
CreatedDate, //作æˆæ—?
CreatedById, //作æˆè€?ID
LastModifiedDate, //最終更新日
LastModifiedById, //最終更新�ID
SystemModstamp, //System Modstamp
LastViewedDate, //最終閲覧日
LastReferencedDate, //最終å‚照日
comment__c, //評価
comment_status__c, //評価ステータ�
content__c, //内容
excerpt__c, //概è¦
status__c, //ステータ�
title__c, //タイトル
ReadOnlyTest__c, //ReadOnlyTest
FormulaTest__c, //æ•°å¼ãƒ†ã‚¹ãƒ?
Account__c //å–引å…?
from Blog__c
Save Your Sfdc Module and build a deploy module package
Topic
- Use SalesforceXytoolsForSublime To Save your sfdc module
- deploy module package
Environment
- Make sure you can login your sfdc. Test it : SFDC-XY > Login SFDC
Save a module
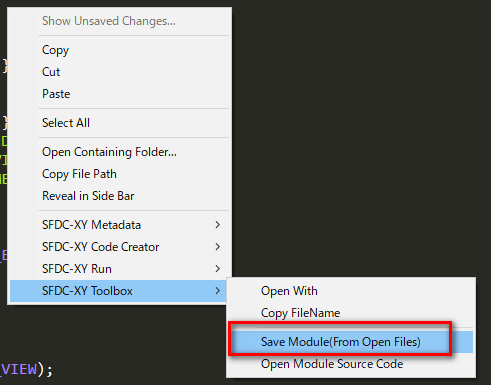
Open the source.
Right Click , SFDC-XY Toolbox> Save Module(From Open Files)
Input your save path

Check your module
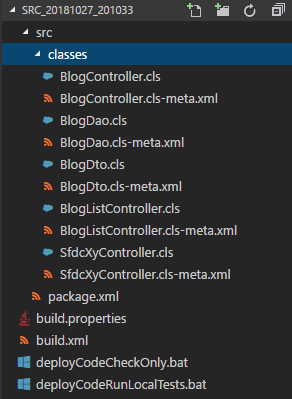
Deploy your module
fix your target sfdc info
open build.properties
sf.username = {username}
sf.password = {password}
##sf.sessionId = <Insert your Salesforce session id here.  Use this or username/password above.  Cannot use both>
##sf.pkgName = <Insert comma separated package names to be retrieved>
##sf.zipFile = <Insert path of the zipfile to be retrieved>
##sf.metadataType = <Insert metadata type name for which listMetadata or bulkRetrieve operations are to be performed>

## Use 'https://login.salesforce.com' for production or developer edition (the default if not specified).
## Use 'https://test.salesforce.com for sandbox.
sf.serverurl = {serverurl}
sf.maxPoll = 500
sf.pollWaitMillis = 10000
## If your network requires an HTTP proxy, see http://ant.apache.org/manual/proxy.html for configuration.
##
windows
only check your code: click deployCodeCheckOnly.bat only!
deploy your code: click deployCodeRunLocalTests.bat only!
Linux/Mac
only check your code
ant deployCodeCheckOnly
deploy your code
ant deployCodeRunLocalTests
Search sfdc metadata
Topic
- Use SalesforceXytoolsForSublime To Search Metadata
Environment
- Make sure you can login your sfdc. Test it : SFDC-XY > Login SFDC
Search Metadata
SFDC-XY > Search Metadata
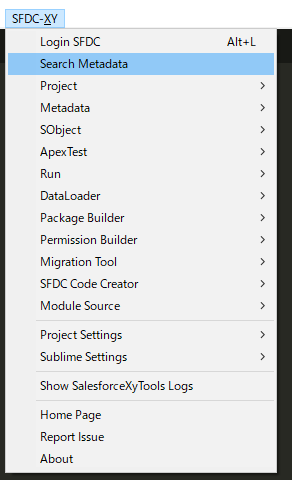
Select metadata type.
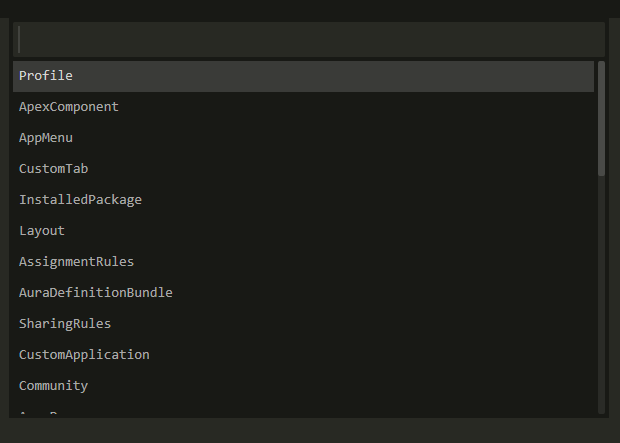
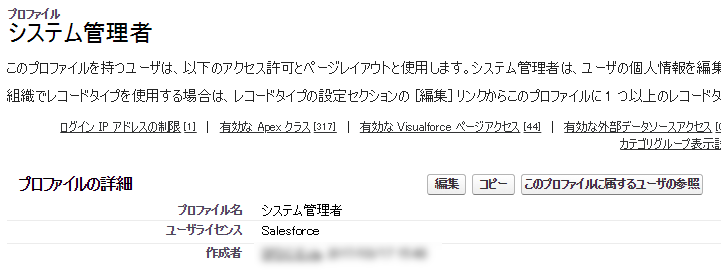
For example, Select Profile, You can find the list of metadata.
Selcet Admin.profile, It will jump to sfdc Admin profile page.

Support Metadata Type
Copy a Lightning Component
Topic
- Use SalesforceXytoolsForSublime To Copy a Lightning Component
Environment
- Make sure you can login your sfdc. Test it : SFDC-XY > Login SFDC
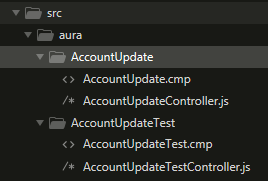
Copy Lightning Component
Select your Lightning component.

Right Click, SFDC-Xy > Copy Lightning Component.
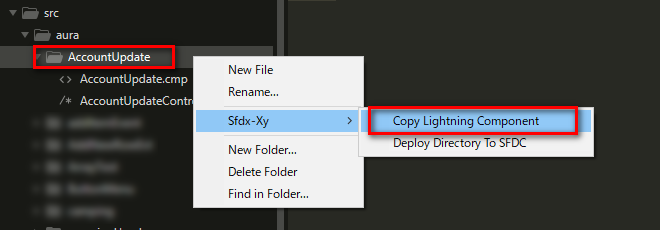
Input your new component name.

Check the new component.
Deploy The component
choose your folder or source in sublime folders, then right click.
Find the menu : Sfdc-Xy > Deploy Directory To SFDC
Lightning Web Components HelloWorld
Topic
In this project, you’ll:
- Install Sublime and Salesforcexytools.
- Set up your
javaandantenvironment. - Auto config salesforce ant-migration-tools
- Create and deploy a Lightning web component.
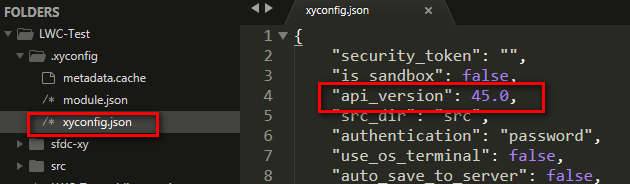
Config Salesforcexytools
How to Config Salesforcexytools.
Please set your api 45.0
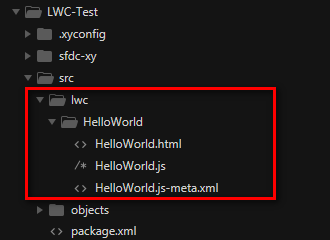
Create a Hello World Lightning Web Component
create a Lightning web component.
The Source is From Create a Hello World Lightning Web Component
Create source in sublime, like below:
helloWorld.html
<template>
    <lightning-card title="HelloWorld" icon-name="custom:custom14">
        <div class="slds-m-around_medium">
            <p>Hello, {greeting}!</p>
            <lightning-input label="Name" value={greeting} onchange={changeHandler}></lightning-input>
        </div>
    </lightning-card>
</template>
helloWorld.js
import { LightningElement, track } from 'lwc';
export default class HelloWorld extends LightningElement {
    @track greeting = 'World';
    changeHandler(event) {
        this.greeting = event.target.value;
    }
}
helloWorld.js-meta.xml
<?xml version="1.0" encoding="UTF-8"?>
<LightningComponentBundle xmlns="http://soap.sforce.com/2006/04/metadata" fqn="helloWorld">
  <apiVersion>45.0</apiVersion>
  <isExposed>true</isExposed>
  <targets>
    <target>lightning__AppPage</target>
    <target>lightning__RecordPage</target>
    <target>lightning__HomePage</target>
  </targets>
</LightningComponentBundle>
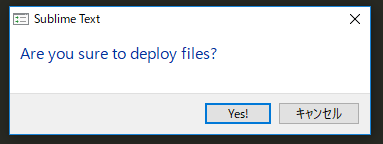
Deploy a Lightning web component
Right Click -> Deploy Directory To Server
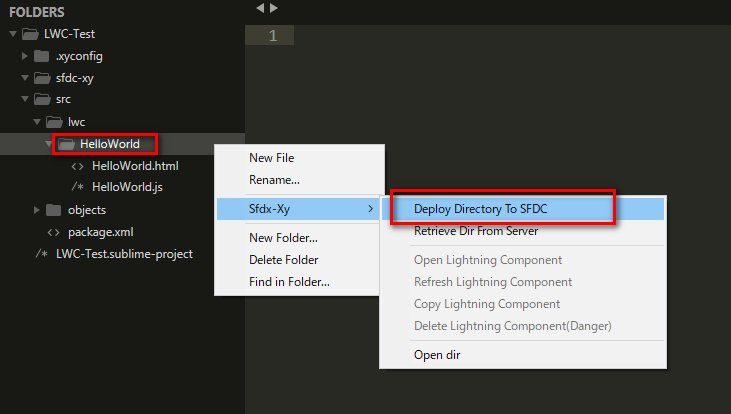
Select Deploy Direcotry

Click Yes!
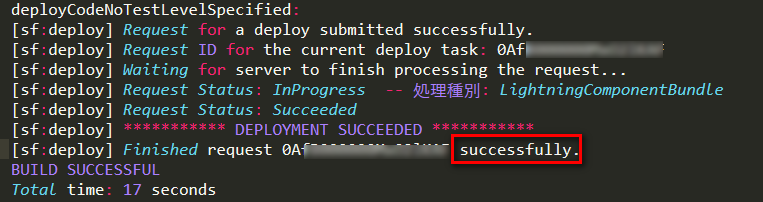
Check the log
Add Component to App in Lightning Experience
Please read Create a Hello World Lightning Web Component
Resources
Introducing Lightning Web Components
Quick Start: Lightning Web Components
Auto Create Salesforce VisualForce Apex
Topic
-
Use SalesforceXytoolsForSublime To Auto Create VisualForce・Apex Controller・DTO・DAO
-
Auto Build Detail Page
- Record Input Page
- Record Review Form
- Save the Record
- Auto Build Record List Page
- List All Records.
- Search Record
- Mass Edit Records
- Records Review Form
Environment
- Make sure you can login your sfdc. Test it : SFDC-XY > Login SFDC
Auto Create VF-Controller-DTO-DAO-Code
Tips: It just create the code in the localhost. It will not deploy to your sfdc server.
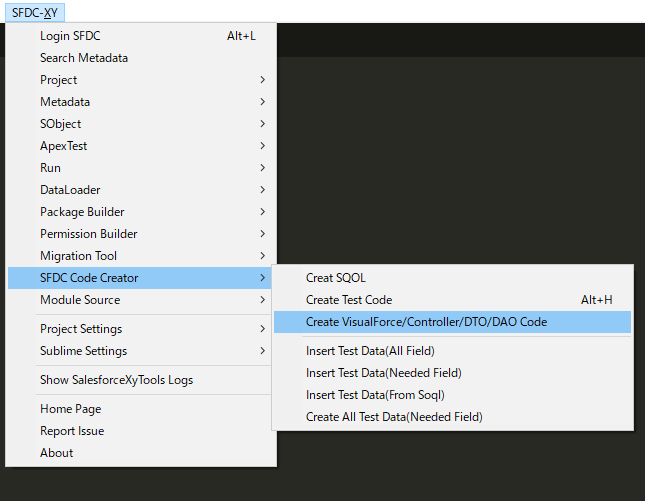
Find the menu
SFDC Code Creator > Create VisualForce/Controller/DTO/DAO Code
Choose your Sobject.
I will select Blog__c.
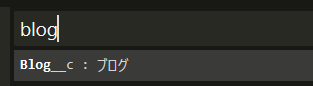
About Blog__c:
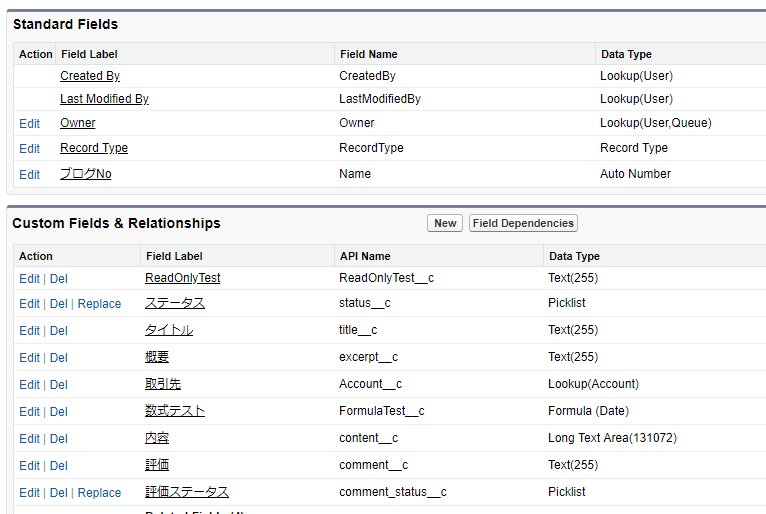
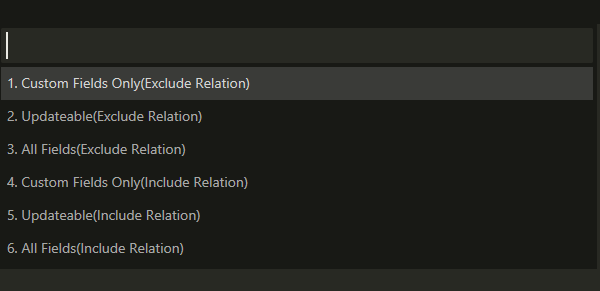
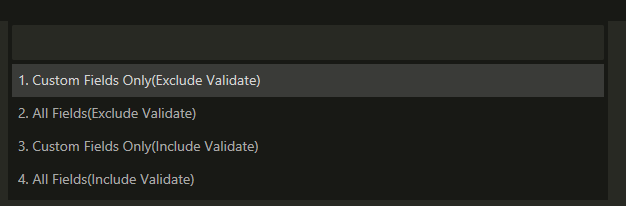
Select Custom Fields Or All Fields.
I will select 1.Custom fields Only(Exculde Validate).
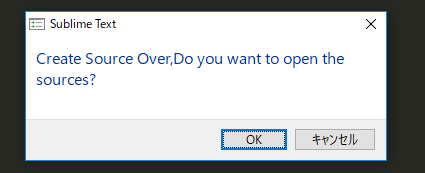
When It is done , It will show the popup like below.
There are many source will be opened if you choose ok.
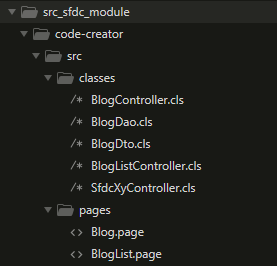
You can find the source in ./src_sfdc_module/code-creator/src
Deploy the codes
choose the src, then right click, Sfdc-Xy > Deploy Directory To SFDC
Tips : If you build a complex page , maybe you can not deploy correctly. Fix the codes, then deploy them.
Run it
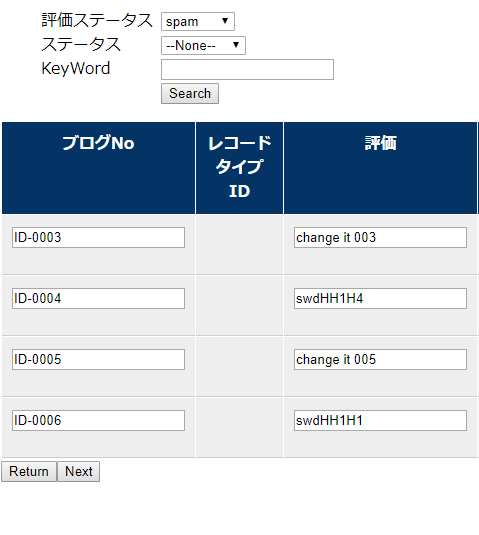
visit the visualforce page
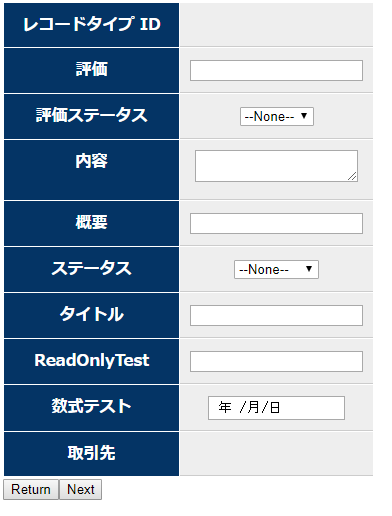
Detail Page.
- Record Input Page
- Record Review Form
- Save the Record
Page URL : https://{instance}.salesforce.com/apex/Blog
Input Form
Review Form
Input something, then click next, then it will go to Review Form
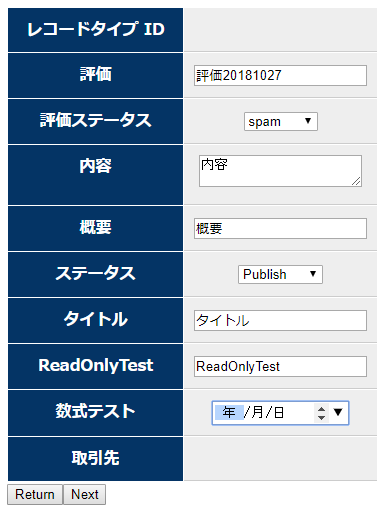
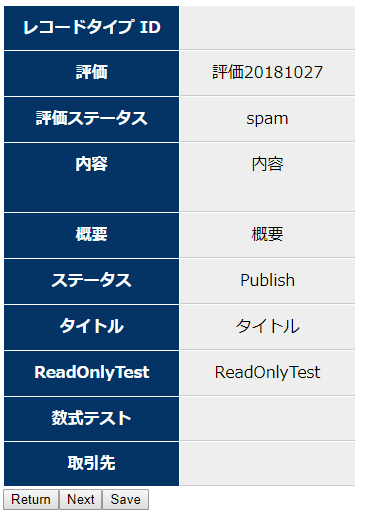
click save, you can save the data.
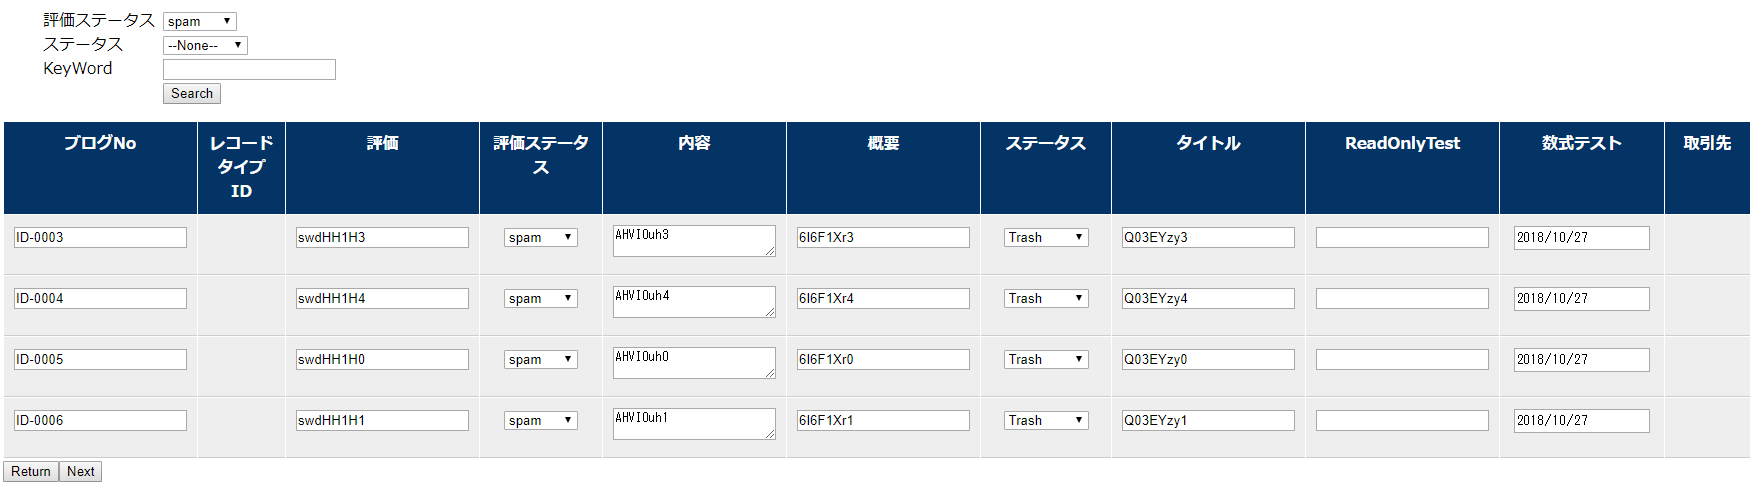
Record List Page
- List All Records.
- Search Record
- Mass Edit Records
- Records Review Form
URL : https://{instance}.salesforce.com/apex/BlogList
List All Records
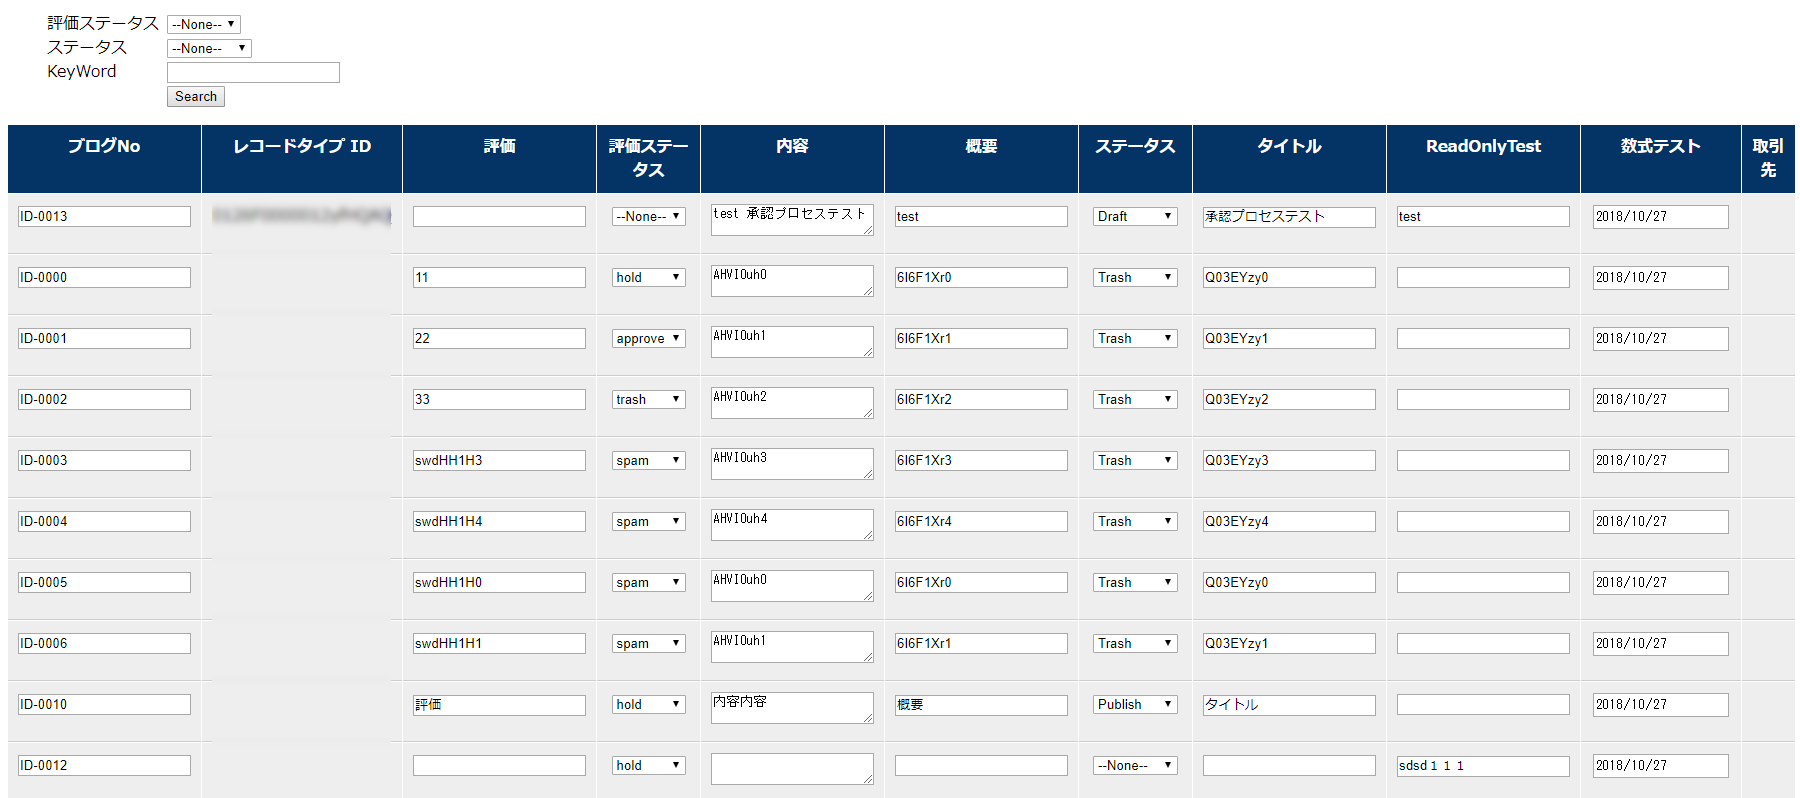
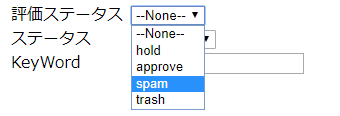
Search Record
Tips: The Picklist will be changed to filter.
Select the filter, and search the data.
Mass Edit Records
Edit records , and click next
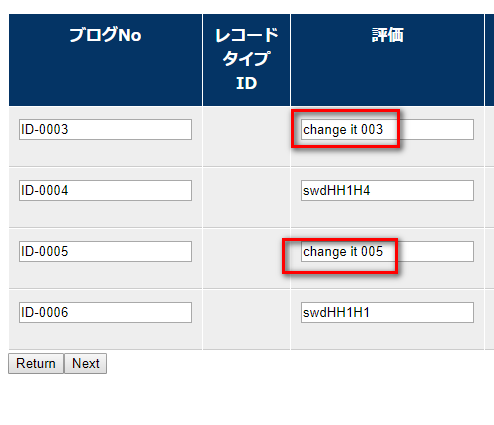
Records Review Form
Go to the review form, and click save button.
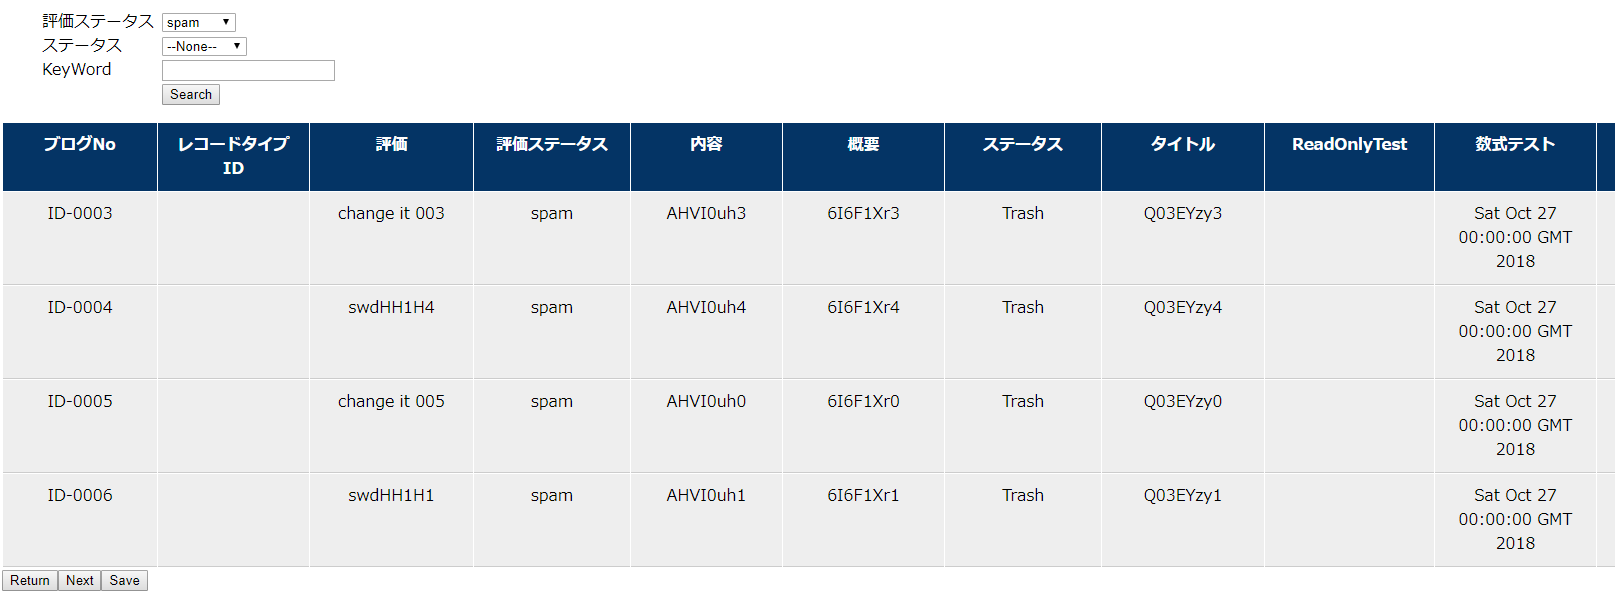
Go back to the list page, check the result.
Salesforce test code creator
Topic
- Use SalesforceXytoolsForSublime To write a test class.
- Auto Create test class.
- Soql to apex code.
Environment
- Make sure you can login your sfdc. Test it : SFDC-XY > Login SFDC
Write a test class
Auto Create TestCode
Tips: It just create the code in the localhost. It will not deploy to your sfdc server.
Open the apex code, Right click.
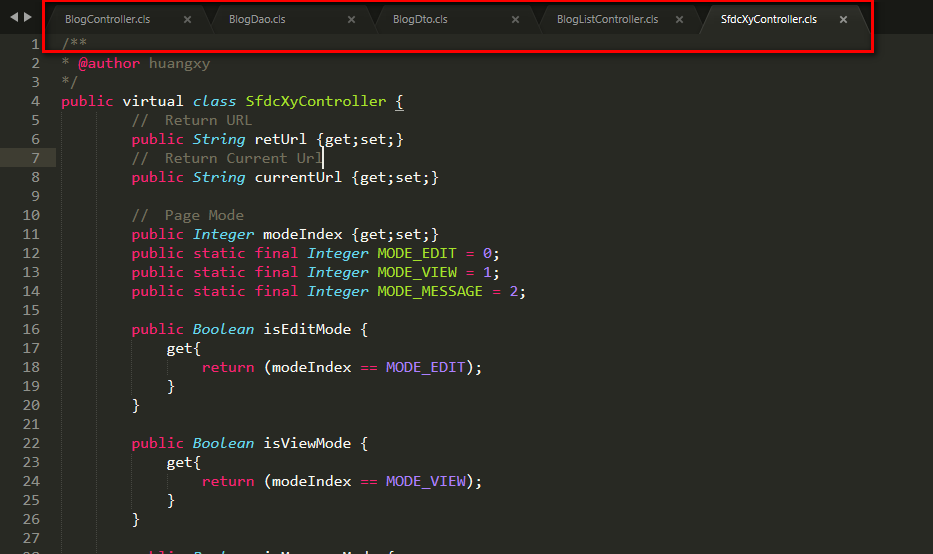
sample code:
/**
* @author huangxy
*/
public with sharing class BlogController extends SfdcXyController {

        // DTO Bean
        public BlogDto blogDto {get;set;}

        public BlogController() {
            search();
        }

        private void search(){
            String id = ApexPages.currentPage().getParameters().get('id');
            if(String.isBlank(id)){
                this.blogDto = new BlogDto();
            }else{
                this.blogDto = new BlogDto(BlogDao.getBlogById(id));
            }
        }

        /**
         * upsert Dto
         */
        public PageReference doSave() {
            Boolean result;

            Savepoint sp = Database.setSavepoint();
            try {
                upsert blogDto.getSobject();
                result = true;
            } catch(DMLException e) {
                Database.rollback(sp);
                System.debug('saveDto DMLException:' + e.getMessage());
                result = false;
            } catch(Exception e) {
                Database.rollback(sp);
                System.debug('saveDto Exception:' + e.getMessage());
                result = false;
            }
            return null;
        }

        /**
         * Go Next
         */
        public override PageReference doNext() {
            Boolean result = doCheck();
            setNextMode(result);
            return null;
        }

        /**
         * Go Back
         */
        public override PageReference doBack() {
            Boolean result = true;
            setBackMode(result);
            return null;
        }

        /**
         * do Check
         */
        public override Boolean doCheck() {
            Boolean result = true;

            return result;
        }
}
Right click, SFDC-XY Code Creator >Create test code
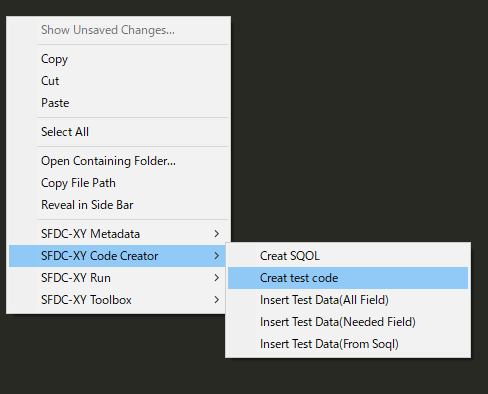
It will be create a test class like this:
/**
* @author huangxy
*/
@isTest
private class BlogControllerTest {

    /**
     * This is a test method for BlogController
     */
    static testMethod void test_BlogController() {

        // PageReference pageRef = Page.Blog;
        // Test.setCurrentPage(pageRef);
        // pageRef.getParameters().put('param1', 'param1');

        Test.startTest();

        BlogController blogController = new BlogController();


        Test.stopTest();

        // Check
        // System.assert(ApexPages.hasMessages());
        // for(ApexPages.Message msg : ApexPages.getMessages()) {
        //     System.assertEquals('Upload file is NULL', msg.getSummary());
        //     System.assertEquals(ApexPages.Severity.ERROR, msg.getSeverity());
        // }
    }


    /**
     * This is a test method for doSave
     */
    static testMethod void test_doSave() {

        // PageReference pageRef = Page.Blog;
        // Test.setCurrentPage(pageRef);
        // pageRef.getParameters().put('param1', 'param1');

        Test.startTest();

        BlogController blogController = new BlogController();
        PageReference resultDoSave = blogController.doSave();


        Test.stopTest();

        // Check
        // System.assert(ApexPages.hasMessages());
        // for(ApexPages.Message msg : ApexPages.getMessages()) {
        //     System.assertEquals('Upload file is NULL', msg.getSummary());
        //     System.assertEquals(ApexPages.Severity.ERROR, msg.getSeverity());
        // }
    }


    /**
     * This is a test method for doNext
     */
    static testMethod void test_doNext() {

        // PageReference pageRef = Page.Blog;
        // Test.setCurrentPage(pageRef);
        // pageRef.getParameters().put('param1', 'param1');

        Test.startTest();

        BlogController blogController = new BlogController();
        PageReference resultDoNext = blogController.doNext();


        Test.stopTest();

        // Check
        // System.assert(ApexPages.hasMessages());
        // for(ApexPages.Message msg : ApexPages.getMessages()) {
        //     System.assertEquals('Upload file is NULL', msg.getSummary());
        //     System.assertEquals(ApexPages.Severity.ERROR, msg.getSeverity());
        // }
    }


    /**
     * This is a test method for doBack
     */
    static testMethod void test_doBack() {

        // PageReference pageRef = Page.Blog;
        // Test.setCurrentPage(pageRef);
        // pageRef.getParameters().put('param1', 'param1');

        Test.startTest();

        BlogController blogController = new BlogController();
        PageReference resultDoBack = blogController.doBack();


        Test.stopTest();

        // Check
        // System.assert(ApexPages.hasMessages());
        // for(ApexPages.Message msg : ApexPages.getMessages()) {
        //     System.assertEquals('Upload file is NULL', msg.getSummary());
        //     System.assertEquals(ApexPages.Severity.ERROR, msg.getSeverity());
        // }
    }


    /**
     * This is a test method for doCheck
     */
    static testMethod void test_doCheck() {

        // PageReference pageRef = Page.Blog;
        // Test.setCurrentPage(pageRef);
        // pageRef.getParameters().put('param1', 'param1');

        Test.startTest();

        BlogController blogController = new BlogController();
        Boolean resultDoCheck = blogController.doCheck();


        Test.stopTest();

        // Check
        // System.assert(ApexPages.hasMessages());
        // for(ApexPages.Message msg : ApexPages.getMessages()) {
        //     System.assertEquals('Upload file is NULL', msg.getSummary());
        //     System.assertEquals(ApexPages.Severity.ERROR, msg.getSeverity());
        // }
    }


    /**
     * This is a test method for all
     */
    static testMethod void test_all() {

        // PageReference pageRef = Page.Blog;
        // Test.setCurrentPage(pageRef);
        // pageRef.getParameters().put('param1', 'param1');

        Test.startTest();

        //  test BlogController
        BlogController blogController = new BlogController();

        //  test doSave
        PageReference resultDoSave = blogController.doSave();

        //  test doNext
        PageReference resultDoNext = blogController.doNext();

        //  test doBack
        PageReference resultDoBack = blogController.doBack();

        //  test doCheck
        Boolean resultDoCheck = blogController.doCheck();


        Test.stopTest();

        // Check
        // System.assert(ApexPages.hasMessages());
        // for(ApexPages.Message msg : ApexPages.getMessages()) {
        //     System.assertEquals('Upload file is NULL', msg.getSummary());
        //     System.assertEquals(ApexPages.Severity.ERROR, msg.getSeverity());
        // }
    }


}
Insert test data from Soql
Insert Test Data(From SOQL)
Input a soql query string.
select id,name,comment__c,content__c from Blog__c limit 2
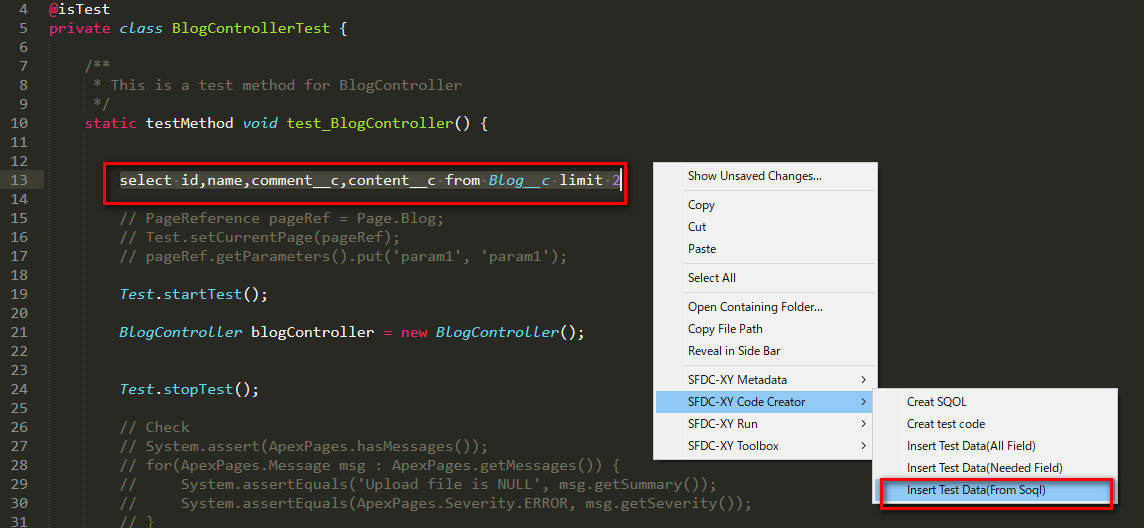
Right click, SFDC-XY Code Creator > Insert Test Data(From Soql)
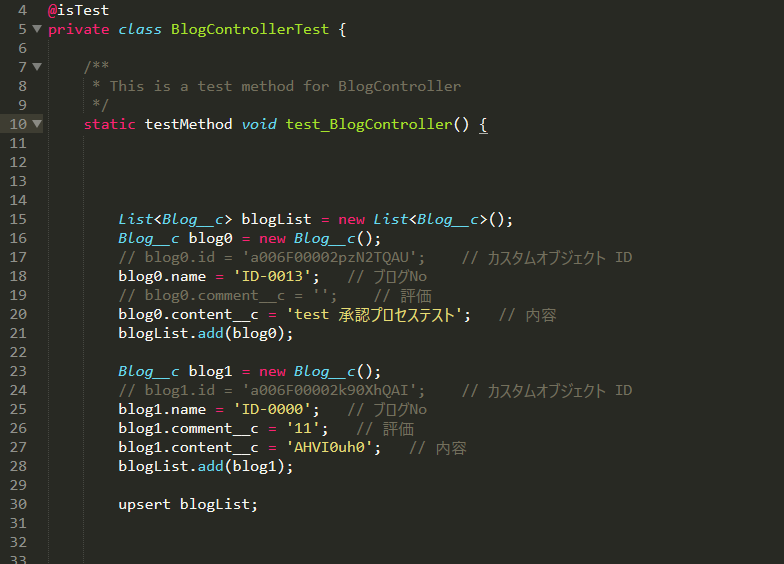
The sql will be change to apex code like below.
```java
List
Blog__c blog1 = new Blog__c();
// blog1.id = 'a006F00002k90XhQAI'; // カスタムオブジェクト ID
blog1.name = 'ID-0000'; // ブãƒã‚°No
blog1.comment__c = '11'; // 評価
blog1.content__c = 'AHVI0uh0'; // 内容
blogList.add(blog1);
upsert blogList;
```
Insert random test data
Right click, SFDC-XY Code Creator > Insert Test Data(All Field) or
SFDC-XY Code Creator > Insert Test Data(Needed Field)
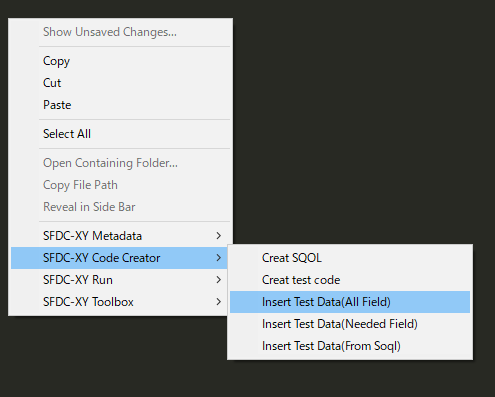
Select your sobject, It will create code like below.
List<Blog__c> blogList = new List<Blog__c>();
for(Integer i=0; i<5; i++){
Blog__c blog = new Blog__c();
blog.RecordTypeId = recordtypeidList[i].id; //レコードタイ�ID
blog.comment__c = '3VG5bF0' + string.valueof(i) ; //評価
blog.comment_status__c = 'approve'; //評価ステータ�
blog.content__c = '6p8psSh' + string.valueof(i) ; //内容
blog.excerpt__c = 'YLpQQAw' + string.valueof(i) ; //概è¦
blog.status__c = 'Draft'; //ステータ�
blog.title__c = 'ot9xvaa' + string.valueof(i) ; //タイトル
blog.ReadOnlyTest__c = 'ld9IPfB' + string.valueof(i) ; //ReadOnlyTest
blog.Account__c = accountList[i].id; //å–引å…?
blogList.add(blog);
}
insert blogList;
SalesforceXytoolsForSublime Reference
SalesforceXytoolsForSublime
SalesforceXytoolsForSublime is Rapid development tools for Salesforce Development.
-
Create Salesforce Project, Retrieve Metadata, Search Metadata
-
Create ApexClass, ApexTrigger, ApexComponent, Refresh, Diff with Server(Support winmerge diff), Save to Server, Deploy to Server
-
SObject Viewer, SObject Description, Export SOjbect Fields to Excel
-
Run SOQL Query, Tooling Query, Apex Script.
-
Code Creator : Auto Create Apex Test Class Code, Auto Create Test Data For Apex Test Class.
-
SFDC Dataviewer, SFDC Online Dataviewer.
-
Atuo Login SFDC (two login type: oauth2 , password config).
-
Quick local sfdc file from sublime.
-
Quick Search SObject Data/SObject Setting/ApexClass/Trigger/VisualForce Page/VisualForce Components/Email Template/Static Resource and open on browser Quickly
-
Package.xml Builder.
-
Build Release Package.
-
Integrate Sfdc Dataloader, Config DataLoader and Run (Need Ant and Java Environment)
Set your schedule, backup your sfdc data.
-
Integrate Sfdc Migration Tool (Need Ant and Java Environment)
-
Auto Backup all metadata script(Set your schedule, backup your sfdc metadata.).
Basic on OpenSource
SalesforceXyToolsForSublime is based on python and open source below.
SalesforceXyToolsForSublime Reference
- SalesforceXyToolsForSublime Guide
- SalesforceXyToolsForSublime-Rapid-development-tools-for-Salesforce
- Source of SalesforceForSublime
- Issues of SalesforceXyToolsForSublime
- Sublime Package Control
Document Reference
- How to Install SalesforceXytoolsForSublime
- How to Config SalesforceXytoolsForSublime
- Use SalesforceXytoolsForSublime to develop SFDC
- Export Sobject to Excel and Search Sobject
- Run sfdc soql, apex script, tooling api
- Auto config salesforce ant-dataloader and Backup Sobject Data
- Auto config salesforce ant-migration-tools and Backup Metadata
- Export Sfdc Sobject Schema To Excel
- Use SalesforceXytoolsForSublime Salesforce Deploy Package
- Salesforce package.xml Auto Builder
- How to export Apex Code Coverage
- PermissionSet Builder
- Soql Creator
- Save Your Sfdc Module and build a deploy module package
- Search sfdc metadata
- Copy a Lightning Component
- Lightning Web Component
- Auto Create Salesforce VisualForce Apex
- Salesforce test code creator
- SalesforceXytoolsForSublime Reference
Download PDF
About Author : Exia.Huang
Other tools for salesforce
-
SalesforceXyToolsCore is base on Python. The core of SalesforceXyTools For Sublime. Soap, Metadata, Rest API For Salesforce.
SalesforceXyTools for Chrome is a developer tools for Salesforce,SFDC,Force.com. Login SFDC By 1 click. Quickly Search Metadata Sobject,Apex,Trigger,Page,Component,EmailTemplate,SataticResource, etc. Auto Create Soql, Run Soql, Soql History. Run Apex Script. Quick Search SFDC Document.